Part 1: Autopilot Automated Device Naming: From Hash Capture to SharePoint Queue
Table of Contents
Before We Begin
This article builds directly on the foundation established in an older Autopilot deployment article which covers what Autopilot is, why the WinPE hash capture approach was chosen over traditional methods, how the custom ISO is built and how the original device registration scripts work together. If you are curious about any of that, it is all documented there, otherwise everything you need about this new solution is explained in detail here.
The Autopilot Deployment Loose Ends
When you are deploying and redeploying multiple devices through Intune Autopilot, device naming quickly becomes more than a cosmetic concern. A consistent naming convention tells you right away what a device is, where it is and how it fits into the modern workplace infrastructure, without having to open its properties or cross-reference a separate spreadsheet.
What Autopilot gives you out of the box is something like 2026-2B3FCFB23B, which works as a unique identifier but it tells you nothing about the device’s purpose or location.
What I wanted instead are custom device names like DT001RO for a desktop, LPT002RO for a laptop and so on. One quick look at the name tells you the device type, the country and exactly how many devices of that type are in the fleet.
The limitation is a design constraint: Autopilot’s built-in naming template only supports two variables, %SERIAL% and %RAND:n%. There is no concept of sequential counters, device types or any other context, so to get the names I wanted, I had to build the naming logic outside of Autopilot entirely and feed it back in through the Graph API.
Why Not Logic Apps or Power Automate?
When I first researched how to automate the Autopilot naming, Azure Logic Apps was the obvious choice. A SharePoint list acts as the queue, something automated reads it, generates the next sequential name and pushes it back via Graph API. Logic Apps can do all of that but it requires an Azure subscription with active billing and unfortunately Logic Apps is not included in Microsoft 365 Business Premium.
My second option was Power Automate which is included in Business Premium. The problem is that calling the Graph API from Power Automate requires the HTTP action and that is classified as a Premium connector. Getting to the same result would mean a Power Automate Premium license at around $15 per user per month, which is more expensive than the Logic Apps consumption billing it was supposed to replace.
The real blocker in both cases is the Graph API call. Everything else, reading and writing a SharePoint list, conditional logic, string operations, is available for free. It is only the part where you need to talk to Microsoft Graph that hits a licensing wall.
A scheduled PowerShell script running on a machine I already own can make Graph API calls with no additional licensing. It reads the SharePoint list, generates the name and pushes the result back. Same logic as a Logic App, just in code instead of a visual designer.
That is what this article documents. It is also easier to troubleshoot since every step is visible in plain PowerShell and every run produces a log file you can read directly.
One thing worth being transparent about is that everything documented in this article was built and tested on an M365 Business Premium tenant running on virtual machines in a home lab. The goal was to find an approach that works within those constraints and document it honestly. If your organisation already has an Azure subscription or Power Automate Premium, those are valid paths and the naming logic translates directly. For smaller environments where that extra licensing is hard to justify, there is another way and this is what this article covers.
Architecture Overview
The solution has three components, the first two run at the device during WinPE, before Windows Setup begins. The third runs independently on a separate machine on a timer. A SharePoint list is the only connection between them, serving as both the work queue and the audit log.
One: CaptureHash.cmd runs in WinPE directly at the device being registered. It captures the hardware hash, auto-detects the chassis type via WMI and prompts the technician to select a department from a short menu. From those two choices it builds a purchaseOrderIdentifier string such as “RO_DT_IT” and hands everything off to the upload script.
Two: Upload_AutopilotHash.ps1 is called by CaptureHash.cmd. It authenticates to Microsoft Graph using Device Code Flow, uploads the hardware hash together with the GroupTag and purchaseOrderIdentifier, creates the corresponding row in SharePoint and triggers an Autopilot sync. (no secrets are stored anywhere in this process)
Three: Invoke-AutopilotNaming.ps1 runs on a separate machine as a scheduled task every 15 minutes. It checks the SharePoint list for rows where Status equals Pending, finds the matching Autopilot device by serial number, generates the next sequential name such as DT001RO or LPT002RO, sets the displayName via Graph API and updates the SharePoint row with the result.
How the data flows between components
When CaptureHash.cmd runs, the technician selects the device type and department. That information is encoded into the purchaseOrderIdentifier field such as “RO_DT_IT” and stored on the Autopilot device object at upload time. Upload_AutopilotHash.ps1 also creates the corresponding row in the SharePoint list automatically as its final step, so by the time the script finishes, both the Autopilot object and the SharePoint queue entry exist.
When Invoke-AutopilotNaming.ps1 runs, it reads the Pending rows from SharePoint, looks up each device in Autopilot by serial number, reads the purchaseOrderIdentifier to determine the device type, generates the correct sequential name and updates both the Autopilot object and the SharePoint row.
Note: The purchaseOrderIdentifier field on an Autopilot device object is read-only after enrollment. It must be set at upload time. This is the key design decision that drives the entire workflow since the device type and department must be captured in WinPE, before the upload happens.
The ISO and What Goes Inside It
The scripts run inside WinPE during Windows Setup, which means they need to be embedded in the boot.wim of your Windows 11 installation ISO. Here is the exact process that worked.
Prerequisites
• Windows ADK installed on a separate device • A Windows 11 25H2 ISO • The six files that go into the Autopilot folder inside boot.wim
The Six Files
Before mounting, place all of these in “C:\AutopilotUSB”:
| File | Purpose |
|---|---|
| CaptureHash.cmd | Main orchestrator script |
| Create_4kHash_using_OA3_Tool.ps1 | Converts OA3.xml output to CSV format |
| Upload_AutopilotHash.ps1 | Uploads hash to Intune via Graph API |
| OA3.cfg | Tells oa3tool.exe where to write its output |
| oa3tool.exe | Generates the hardware hash from SMBIOS and TPM |
| PCPKsp.dll | TPM provider DLL required by oa3tool.exe |
For the QR code feature in Upload_AutopilotHash.ps1, you also need a “QRModule” subfolder containing QRCoder.dll. This DLL is loaded at runtime as a byte array, which avoids execution policy issues in WinPE.
OA3.cfg Contents
<OA3>
   <FileBased>
       <InputKeyXMLFile>".\input.XML"</InputKeyXMLFile>
   </FileBased>
   <OutputData>
       <AssembledBinaryFile>.\OA3.bin</AssembledBinaryFile>
       <ReportedXMLFile>.\OA3.xml</ReportedXMLFile>
   </OutputData>
</OA3>
CaptureHash.cmd
The original version of “CaptureHash.cmd” used a single hardcoded GroupTag with no chassis detection and no department selection. The new version described here adds automatic chassis type detection, a manual fallback menu for VMware (chassis type 1), department selection and the purchaseOrderIdentifier logic that drives the device naming.
This is what runs when the technician presses Shift+F10 at the Windows Setup screen and types “X:\Autopilot\CaptureHash.cmd”.
Four things worth knowing before you look at the script:
- The Windows 11 installer boot.wim does not auto-initialize the network adapter the way standalone WinPE does. Without “wpeutil InitializeNetwork” at the start, all network calls will fail silently.
- For delays use “ping 127.0.0.1 -n 6 >nul” instead of “timeout” since the “timeout” command does not exist in WinPE and fails with a misleading error message.
- “Win32_SystemEnclosure” reports chassis type 1 for all VMware VMs because SMBIOS Type 1 is left blank. The script handles this with a manual selection menu. On real physical hardware the chassis type maps correctly without any prompt.
- The “purchaseOrderIdentifier” is read-only after enrollment, so the device type and department must be captured in WinPE before the upload happens. This single constraint drove the entire design.
Note: The purchaseOrderIdentifier format is “RO_DT_IT” or “RO_LPT_Finance”. The country code (RO) is hardcoded because this tenant is Romania-only. The device type and department come from the technician’s selections during the WinPE session.
# CaptureHash.cmd
# Author: RaduBogdan @ devworkplace.cloud

@echo off
setlocal enabledelayedexpansion

echo.
echo ==========================================
echo   Autopilot Device Registration
echo   HalfOnCloud RO
echo ==========================================
echo.

:: -------------------------------------------------------
:: STEP 0 - NETWORK INIT (required in WinPE/boot.wim)
:: -------------------------------------------------------

echo [0/6] Initializing network...
wpeutil InitializeNetwork
ping 127.0.0.1 -n 6 >nul

:: -------------------------------------------------------
:: STEP 1 - AUTO-DETECT DEVICE TYPE FROM CHASSIS
:: -------------------------------------------------------

:: Query WMI for chassis type
for /f "tokens=2 delims==" %%a in ('wmic path Win32_SystemEnclosure get ChassisTypes /value 2^>nul') do set CHASSIS_RAW=%%a

:: Clean up the value (remove spaces and braces)
set CHASSIS_RAW=%CHASSIS_RAW: =%
set CHASSIS_RAW=%CHASSIS_RAW:{=%
set CHASSIS_RAW=%CHASSIS_RAW:}=%

echo Detected Chassis Type Code: %CHASSIS_RAW%
echo.

:: Map chassis type to device prefix
set DEVICE_TYPE=UNKNOWN

:: Laptop types: 8=Portable, 9=Laptop, 10=Notebook, 11=HandHeld, 14=SubNotebook
if "%CHASSIS_RAW%"=="8"  set DEVICE_TYPE=LPT
if "%CHASSIS_RAW%"=="9"  set DEVICE_TYPE=LPT
if "%CHASSIS_RAW%"=="10" set DEVICE_TYPE=LPT
if "%CHASSIS_RAW%"=="11" set DEVICE_TYPE=LPT
if "%CHASSIS_RAW%"=="14" set DEVICE_TYPE=LPT

:: Desktop types: 3=Desktop, 4=LowProfile, 5=PizzaBox, 6=MiniTower, 7=Tower, 13=AllInOne, 15=SpaceSaving
if "%CHASSIS_RAW%"=="3"  set DEVICE_TYPE=DT
if "%CHASSIS_RAW%"=="4"  set DEVICE_TYPE=DT
if "%CHASSIS_RAW%"=="5"  set DEVICE_TYPE=DT
if "%CHASSIS_RAW%"=="6"  set DEVICE_TYPE=DT
if "%CHASSIS_RAW%"=="7"  set DEVICE_TYPE=DT
if "%CHASSIS_RAW%"=="13" set DEVICE_TYPE=DT
if "%CHASSIS_RAW%"=="15" set DEVICE_TYPE=DT

:: Tablet types: 30=Tablet, 31=Convertible, 32=Detachable
if "%CHASSIS_RAW%"=="30" set DEVICE_TYPE=TB
if "%CHASSIS_RAW%"=="31" set DEVICE_TYPE=TB
if "%CHASSIS_RAW%"=="32" set DEVICE_TYPE=TB

:: -------------------------------------------------------
:: STEP 2 - IF UNKNOWN (VMware or unrecognized), ASK TECHNICIAN
:: -------------------------------------------------------

if "%DEVICE_TYPE%"=="UNKNOWN" (
    echo Device type could not be auto-detected.
    echo.
    echo Select device type:
    echo   1^) Laptop
    echo   2^) Desktop
    echo   3^) Tablet
    echo.
    set /p DEVICE_CHOICE=Enter number [1-3]:

    if "!DEVICE_CHOICE!"=="1" set DEVICE_TYPE=LPT
    if "!DEVICE_CHOICE!"=="2" set DEVICE_TYPE=DT
    if "!DEVICE_CHOICE!"=="3" set DEVICE_TYPE=TB

    if "!DEVICE_TYPE!"=="UNKNOWN" (
        echo Invalid selection. Exiting.
        pause
        exit /b 1
    )
)

echo Device Type: %DEVICE_TYPE%
echo.

:: -------------------------------------------------------
:: STEP 3 - DEPARTMENT MENU
:: -------------------------------------------------------

echo Select department:
echo   1^) Finance
echo   2^) IT
echo   3^) Marketing
echo   4^) HR
echo   5^) Reception
echo.
set /p DEPT_CHOICE=Enter number [1-5]:

set DEPARTMENT=UNKNOWN
if "%DEPT_CHOICE%"=="1" set DEPARTMENT=Finance
if "%DEPT_CHOICE%"=="2" set DEPARTMENT=IT
if "%DEPT_CHOICE%"=="3" set DEPARTMENT=Marketing
if "%DEPT_CHOICE%"=="4" set DEPARTMENT=HR
if "%DEPT_CHOICE%"=="5" set DEPARTMENT=Reception

if "%DEPARTMENT%"=="UNKNOWN" (
    echo Invalid selection. Exiting.
    pause
    exit /b 1
)

echo Department: %DEPARTMENT%
echo.

:: -------------------------------------------------------
:: STEP 4 - BUILD PURCHASE ORDER IDENTIFIER
:: -------------------------------------------------------

set PURCHASE_ORDER=RO_%DEVICE_TYPE%_%DEPARTMENT%

echo ==========================================
echo   Summary
echo   Device Type : %DEVICE_TYPE%
echo   Department  : %DEPARTMENT%
echo   Order ID    : %PURCHASE_ORDER%
echo ==========================================
echo.

:: -------------------------------------------------------
:: STEP 5 - REGISTER TPM SUPPORT
:: -------------------------------------------------------

echo [1/6] Registering TPM support...
regsvr32 /s X:\Autopilot\PCPKsp.dll

:: -------------------------------------------------------
:: STEP 6 - GENERATE HARDWARE HASH
:: -------------------------------------------------------

echo [2/6] Generating hardware hash...
X:\Autopilot\oa3tool.exe /Report /ConfigFile=X:\Autopilot\OA3.cfg /NoKeyCheck

:: -------------------------------------------------------
:: STEP 7 - CONVERT TO CSV
:: -------------------------------------------------------

echo [3/6] Converting to CSV format...
PowerShell -ExecutionPolicy Bypass -File "X:\Autopilot\Create_4kHash_using_OA3_Tool.ps1" -OutputFile "X:\Autopilot\AutopilotHash.csv"

:: -------------------------------------------------------
:: STEP 8 - UPLOAD TO INTUNE + CREATE SHAREPOINT ROW
:: -------------------------------------------------------

echo [4/6] Uploading to Intune and creating naming row...
PowerShell -ExecutionPolicy Bypass -File "X:\Autopilot\Upload_AutopilotHash.ps1" ^
    -CsvFile "X:\Autopilot\AutopilotHash.csv" ^
    -GroupTag "A-RO-U-D-V" ^
    -PurchaseOrderIdentifier "%PURCHASE_ORDER%" ^
    -DeviceType "%DEVICE_TYPE%" ^
    -Department "%DEPARTMENT%"

echo.
echo ==========================================
echo   Device registered to Autopilot!
echo   You can now reboot and start Autopilot.
echo ==========================================
echo.
pause
Create_4kHash_using_OA3_Tool.ps1
This script converts the XML output from oa3tool.exe into the CSV format that Intune expects. It reads the OA3.xml file that oa3tool writes, extracts the hardware hash and serial number, and produces a correctly formatted CSV. The field names in the CSV header matter since Intune will reject the file if they are wrong.
# Create_4kHash_using_OA3_Tool.ps1
# Source: Michael Meier (mmeierm) adapted for standalone use
# Author: RaduBogdan @ devworkplace.cloud

param(
    [Parameter(Mandatory=$false)]
    [string]$OutputFile = ".\AutopilotHash.csv"
)

$ScriptDir = Split-Path -Parent $MyInvocation.MyCommand.Path

# Check if OA3.xml exists (generated by oa3tool.exe)
$OA3XML = Join-Path $ScriptDir "OA3.xml"

if (-not (Test-Path $OA3XML)) {
    Write-Error "OA3.xml not found. Run oa3tool.exe first!"
    exit 1
}

# Parse the XML
[xml]$xml = Get-Content $OA3XML

# Extract values
$HardwareHash  = $xml.Key.HardwareHash
$SerialNumber  = $xml.Key.ProductKeyInfo.SmbiosSystemSerialNumber

# WMI fallback for VMware or devices where OA3 doesn't capture serial
if ([string]::IsNullOrEmpty($SerialNumber)) {
    $SerialNumber = (Get-WmiObject Win32_BIOS).SerialNumber
    Write-Host "Serial from WMI fallback: $SerialNumber" -ForegroundColor Yellow
}

if ([string]::IsNullOrEmpty($HardwareHash)) {
    Write-Error "Hardware hash not found in OA3.xml"
    exit 1
}

# Create CSV content
$csvContent = @"
Device Serial Number,Windows Product ID,Hardware Hash
$SerialNumber,,$HardwareHash
"@

# Write to file
$csvContent | Out-File -FilePath $OutputFile -Encoding ASCII -Force

Write-Host "SUCCESS: Hash exported to $OutputFile" -ForegroundColor Green
Write-Host "Serial Number: $SerialNumber" -ForegroundColor Cyan
Note: On VMware VMs, OA3Tool reads SMBIOS Type 1 which VMware leaves empty, so SmbiosSystemSerialNumber will be blank in the CSV. This is expected and does not prevent the upload. Intune uses the hardware hash for matching. On physical hardware, the serial number populates correctly from SMBIOS.
Upload_AutopilotHash.ps1
This script does the actual Intune upload. The key decision here was to use Device Code Flow for authentication rather than a client secret or stored credentials. This means no secrets are embedded anywhere not in the script, the USB drive or in any file on the machine. The technician authenticates interactively via their phone or another device.
The script uses Microsoft’s own public Graph PowerShell App ID (14d82eec-204b-4c2f-b7e8-296a70dab67e) which is publicly documented and safe to use for delegated flows like this one.
To make the authentication step as fast as possible in a WinPE environment, the script renders a QR code directly in the terminal using QRCoder.dll loaded as a byte array. The technician scans the QR code with their phone, authenticates and the script continues automatically.
Note: If the DLL is missing, the script falls back gracefully to displaying the manual device code.
# Upload_AutopilotHash.ps1
# Secure upload using Device Code Flow with QR Code support
# Author: RaduBogdan @ devworkplace.cloud

param(
    [Parameter(Mandatory=$false)]
    [string]$CsvFile = "X:\Autopilot\AutopilotHash.csv",

    [Parameter(Mandatory=$false)]
    [string]$GroupTag = "A-RO-U-D-V",

    [Parameter(Mandatory=$false)]
    [string]$PurchaseOrderIdentifier = "",

    [Parameter(Mandatory=$false)]
    [string]$DeviceType = "",

    [Parameter(Mandatory=$false)]
    [string]$Department = ""
)

# Microsoft Graph PowerShell App ID (public, safe to use)
$ClientID = "<your-client-id-here>"

# SharePoint configuration
$SharePointHostname = "<your-sharepoint-host-here>"
$SharePointSitePath = ""
$SharePointListName = "AutopilotDeviceNaming"

# Script location (works in both full Windows and WinPE)
$ScriptDir = Split-Path -Parent $MyInvocation.MyCommand.Definition

Write-Host ""
Write-Host "==========================================" -ForegroundColor Cyan
Write-Host "  Autopilot Hash Upload - QR Code Edition" -ForegroundColor Cyan
Write-Host "==========================================" -ForegroundColor Cyan
Write-Host ""

# Check CSV exists
if (-not (Test-Path $CsvFile)) {
    Write-Error "CSV file not found: $CsvFile"
    exit 1
}

# Read CSV
$csv = Import-Csv $CsvFile
$SerialNumber = [string]($csv.'Device Serial Number')
$HardwareHash = [string]($csv.'Hardware Hash')

Write-Host "Device Serial: $SerialNumber" -ForegroundColor Yellow
Write-Host "Group Tag: $GroupTag" -ForegroundColor Yellow
if ($PurchaseOrderIdentifier -ne "") {
    Write-Host "Purchase Order: $PurchaseOrderIdentifier" -ForegroundColor Yellow
}
Write-Host ""

# === DEVICE CODE FLOW ===
Write-Host "[1/5] Requesting device code..." -ForegroundColor Green

$deviceCodeRequest = @{
    client_id = $ClientID
    scope     = "https://graph.microsoft.com/DeviceManagementServiceConfig.ReadWrite.All https://graph.microsoft.com/Sites.ReadWrite.All offline_access"
}

$deviceCodeResponse = Invoke-RestMethod -Method Post `
    -Uri "https://login.microsoftonline.com/organizations/oauth2/v2.0/devicecode" `
    -Body $deviceCodeRequest

$userCode = $deviceCodeResponse.user_code

# === QR CODE GENERATION ===
# Build the URL with the one-time code embedded
$deviceLoginUrl = "https://microsoft.com/devicelogin?otc=$userCode"

Write-Host ""
Write-Host "==========================================" -ForegroundColor Yellow
Write-Host "  SCAN QR CODE WITH YOUR PHONE" -ForegroundColor Yellow
Write-Host "==========================================" -ForegroundColor Yellow

# Try to generate QR code using QRCoder.dll
$qrSuccess = $false

# Look for QRCoder.dll in QRModule subfolder, then same folder
$dllPath = Join-Path $ScriptDir "QRModule\QRCoder.dll"
if (-not (Test-Path $dllPath)) {
    $dllPath = Join-Path $ScriptDir "QRCoder.dll"
}

if (Test-Path $dllPath) {
    try {
        # Load via byte array (no file locks, no execution policy issues)
        $bytes = [System.IO.File]::ReadAllBytes($dllPath)
        [void][System.Reflection.Assembly]::Load([byte[]]$bytes)

        # Generate QR code data
        $qrGenerator = New-Object QRCoder.QRCodeGenerator
        $qrCodeData  = $qrGenerator.CreateQrCode($deviceLoginUrl, [QRCoder.QRCodeGenerator+ECCLevel]::M)

        # Render using Unicode half-block characters
        $matrix = $qrCodeData.ModuleMatrix
        $size   = $matrix.Count
        $quiet  = 2

        Write-Host ""

        for ($y = -$quiet; $y -lt ($size + $quiet); $y += 2) {
            $line = ""
            for ($x = -$quiet; $x -lt ($size + $quiet); $x++) {
                # Top pixel
                if ($y -ge 0 -and $y -lt $size -and $x -ge 0 -and $x -lt $size) {
                    $top = $matrix[$y][$x]
                } else { $top = $false }

                # Bottom pixel
                $y2 = $y + 1
                if ($y2 -ge 0 -and $y2 -lt $size -and $x -ge 0 -and $x -lt $size) {
                    $bottom = $matrix[$y2][$x]
                } else { $bottom = $false }

                # Combine into half-block character
                if     ($top -and $bottom)      { $line += [char]0x2588 }
                elseif ($top -and -not $bottom)  { $line += [char]0x2580 }
                elseif (-not $top -and $bottom)  { $line += [char]0x2584 }
                else                             { $line += " " }
            }
            Write-Host $line
        }

        Write-Host ""
        $qrSuccess = $true
    }
    catch {
        Write-Host "QR generation failed, use manual method below" -ForegroundColor Red
    }
}
else {
    Write-Host "QR generation failed, use manual method below" -ForegroundColor Red
}

# Always show manual fallback (in case QR won't scan or DLL missing)
Write-Host "==========================================" -ForegroundColor Yellow
Write-Host "  OR MANUALLY:" -ForegroundColor Yellow
Write-Host "  1. Go to: https://microsoft.com/devicelogin" -ForegroundColor White
Write-Host "  2. Enter code: $userCode" -ForegroundColor White -BackgroundColor DarkBlue
Write-Host "==========================================" -ForegroundColor Yellow
Write-Host ""
Write-Host "Waiting for authentication..." -ForegroundColor Gray
Write-Host "(Code expires in 15 minutes)" -ForegroundColor DarkGray

# Poll for token
$tokenRequest = @{
    grant_type  = "urn:ietf:params:oauth:grant-type:device_code"
    client_id   = $ClientID
    device_code = $deviceCodeResponse.device_code
}

$timeout = [DateTime]::Now.AddSeconds($deviceCodeResponse.expires_in)
$token = $null

while ([DateTime]::Now -lt $timeout -and -not $token) {
    Start-Sleep -Seconds 5
    try {
        $tokenResponse = Invoke-RestMethod -Method Post `
            -Uri "https://login.microsoftonline.com/organizations/oauth2/v2.0/token" `
            -Body $tokenRequest
        $token = $tokenResponse.access_token
    } catch {
        # Still waiting for user to authenticate
    }
}

if (-not $token) {
    Write-Error "Authentication timed out!"
    exit 1
}

Write-Host "[2/5] Authentication successful!" -ForegroundColor Green

# Prepare headers
$headers = @{
    "Authorization" = "Bearer $token"
    "Content-Type"  = "application/json"
}

# Prepare device data
$deviceData = @{
    "@odata.type"        = "#microsoft.graph.importedWindowsAutopilotDeviceIdentity"
    "groupTag"           = $GroupTag
    "serialNumber"       = $SerialNumber
    "hardwareIdentifier" = $HardwareHash
}

# Add purchaseOrderIdentifier only if provided
if ($PurchaseOrderIdentifier -ne "") {
    $deviceData["purchaseOrderIdentifier"] = $PurchaseOrderIdentifier
}

$jsonBody = $deviceData | ConvertTo-Json

# Upload to Intune
Write-Host "[3/5] Uploading to Intune..." -ForegroundColor Green

try {
    $uploadResponse = Invoke-RestMethod -Method Post `
        -Uri "https://graph.microsoft.com/v1.0/deviceManagement/importedWindowsAutopilotDeviceIdentities" `
        -Headers $headers -Body $jsonBody
    Write-Host "      Upload successful!" -ForegroundColor Green
} catch {
    Write-Error "Upload failed: $_"
    exit 1
}

# Trigger sync
Write-Host "[4/5] Triggering Autopilot sync..." -ForegroundColor Green
try {
    Invoke-RestMethod -Method Post `
        -Uri "https://graph.microsoft.com/v1.0/deviceManagement/windowsAutopilotSettings/sync" `
        -Headers $headers | Out-Null
    Write-Host "      Sync triggered!" -ForegroundColor Green
} catch {
    Write-Host "      Sync skipped (non-critical)" -ForegroundColor Yellow
}

# === STEP 5 - CREATE SHAREPOINT ROW ===
if ($DeviceType -ne "" -and $Department -ne "") {
    Write-Host "[5/5] Creating SharePoint naming row..." -ForegroundColor Green
    try {
        # Resolve site ID
        $siteResponse = Invoke-RestMethod `
            -Uri "https://graph.microsoft.com/v1.0/sites/halfoncloud.sharepoint.com" `
            -Headers $headers
        $siteId = $siteResponse.id

        # Resolve list ID
        $listsResponse = Invoke-RestMethod `
            -Uri "https://graph.microsoft.com/v1.0/sites/$siteId/lists?`$filter=displayName eq '$SharePointListName'" `
            -Headers $headers
        $listId = $listsResponse.value[0].id

        # Create new row
		$rowBody = ConvertTo-Json @{
			fields = @{
				Status       = "Pending"
				SerialNumber = $SerialNumber
				DeviceType   = $DeviceType
				Department   = $Department
    }
}

        Invoke-RestMethod `
            -Uri "https://graph.microsoft.com/v1.0/sites/$siteId/lists/$listId/items" `
            -Method Post `
            -Headers $headers `
            -Body $rowBody | Out-Null

        Write-Host "      SharePoint row created!" -ForegroundColor Green
    } catch {
        Write-Host "      SharePoint row creation failed: $_" -ForegroundColor Red
        Write-Host "      Device is registered in Autopilot but will need manual SharePoint entry." -ForegroundColor Yellow
    }
} else {
    Write-Host "[5/5] SharePoint row skipped (no DeviceType/Department provided)." -ForegroundColor Yellow
}

Write-Host ""
Write-Host "==========================================" -ForegroundColor Cyan
Write-Host "  SUCCESS! Device uploaded to Autopilot" -ForegroundColor Green
Write-Host "  Serial: $SerialNumber" -ForegroundColor White
Write-Host "  GroupTag: $GroupTag" -ForegroundColor White
if ($PurchaseOrderIdentifier -ne "") {
    Write-Host "  Purchase Order: $PurchaseOrderIdentifier" -ForegroundColor White
}
if ($DeviceType -ne "") {
    Write-Host "  Device Type: $DeviceType" -ForegroundColor White
}
if ($Department -ne "") {
    Write-Host "  Department: $Department" -ForegroundColor White
}
Write-Host "==========================================" -ForegroundColor Cyan
Write-Host ""
Mounting, Injecting WinPE Components and Copying Files
The default Windows 11 boot.wim (index 2) does not include PowerShell or WMI. You must inject them before copying your scripts. The order matters because of dependencies, each package relies on the one before it.
Mount boot.wim, inject in this exact order, copy your files, then unmount:
# Mount boot.wim index 2
Mount-WindowsImage `

    -ImagePath "C:\ISO_Build\ISO_Files\sources\boot.wim" `
    -Index 2 `
    -Path "C:\ISO_Build\Mount"

# WinPE optional components path
$OCPath = "C:\Program Files (x86)\Windows Kits\10\Assessment and Deployment Kit\Windows Preinstallation Environment\amd64\WinPE_OCs"

# Inject in this exact order (dependencies)
Dism /Add-Package /Image:"C:\ISO_Build\Mount" /PackagePath:"$OCPath\WinPE-WMI.cab"
Dism /Add-Package /Image:"C:\ISO_Build\Mount" /PackagePath:"$OCPath\en-us\WinPE-WMI_en-us.cab"
Dism /Add-Package /Image:"C:\ISO_Build\Mount" /PackagePath:"$OCPath\WinPE-NetFX.cab"
Dism /Add-Package /Image:"C:\ISO_Build\Mount" /PackagePath:"$OCPath\en-us\WinPE-NetFX_en-us.cab"
Dism /Add-Package /Image:"C:\ISO_Build\Mount" /PackagePath:"$OCPath\WinPE-Scripting.cab"
Dism /Add-Package /Image:"C:\ISO_Build\Mount" /PackagePath:"$OCPath\en-us\WinPE-Scripting_en-us.cab"
Dism /Add-Package /Image:"C:\ISO_Build\Mount" /PackagePath:"$OCPath\WinPE-PowerShell.cab"
Dism /Add-Package /Image:"C:\ISO_Build\Mount" /PackagePath:"$OCPath\en-us\WinPE-PowerShell_en-us.cab"
Dism /Add-Package /Image:"C:\ISO_Build\Mount" /PackagePath:"$OCPath\WinPE-StorageWMI.cab"
Dism /Add-Package /Image:"C:\ISO_Build\Mount" /PackagePath:"$OCPath\en-us\WinPE-StorageWMI_en-us.cab"

# Create the Autopilot folder and copy files
New-Item -Path "C:\ISO_Build\Mount\Autopilot" -ItemType Directory -Force
Copy-Item -Path "C:\AutopilotUSB\*" -Destination "C:\ISO_Build\Mount\Autopilot\" -Recurse -Force

# Verify files are present
Get-ChildItem "C:\ISO_Build\Mount\Autopilot\"
Unmount and Rebuild ISO
Once the files are copied, save the changes back to boot.wim and rebuild the ISO with oscdimg. The “-bootdata” parameter ensures the ISO boots correctly on both BIOS and UEFI systems.
# Save changes to boot.wim
Dismount-WindowsImage -Path "C:\ISO_Build\Mount" -Save

# Remove old ISO if it exists
Remove-Item "C:\ISO\Windows11_Autopilot_25H2.iso" -Force -ErrorAction SilentlyContinue

# Rebuild ISO
$OscdimgPath = "C:\Program Files (x86)\Windows Kits\10\Assessment and Deployment Kit\Deployment Tools\amd64\Oscdimg\oscdimg.exe"

& $OscdimgPath -m -o -u2 -udfver102 `
-bootdata:2#p0,e,b"C:\ISO_Build\ISO_Files\boot\etfsboot.com"#pEF,e,b"C:\ISO_Build\ISO_Files\efi\microsoft\boot\efisys.bin" `
    "C:\ISO_Build\ISO_Files" `
    "C:\ISO\Windows11_Autopilot_25H2.iso"
SharePoint List Setup
The SharePoint list called AutopilotDeviceNaming is the queue that connects the two parts of this solution. The WinPE side writes a Pending row when a device is registered. The naming script covered in Part 2, reads those rows and writes the result back.
The list was created on the root SharePoint site with these columns:
| Column Name | Type | Notes |
|---|---|---|
| Title | Single line | Default column |
| Serial number | Single line | The device serial number from the hash upload |
| DeviceType | Single line | LPT, DT or TB |
| Department | Single line | Finance, IT, Marketing, etc. |
| Status | Single line | Pending, Named or Error |
| GeneratedName | Single line | Filled by the naming script |
| AutopilotID | Single line | Filled by the naming script |
How rows get created
The row is created automatically by Upload_AutopilotHash.ps1 as its final step. When the hash upload completes, the script writes a new row with the serial number, DeviceType, Department and Status set to Pending. By the time the naming script runs its next scheduled check, the row is already there.
The SharePoint list is the only connection between the WinPE scripts and the naming script. The WinPE side writes to it, the naming script reads from it and updates it. Everything passes through this list.
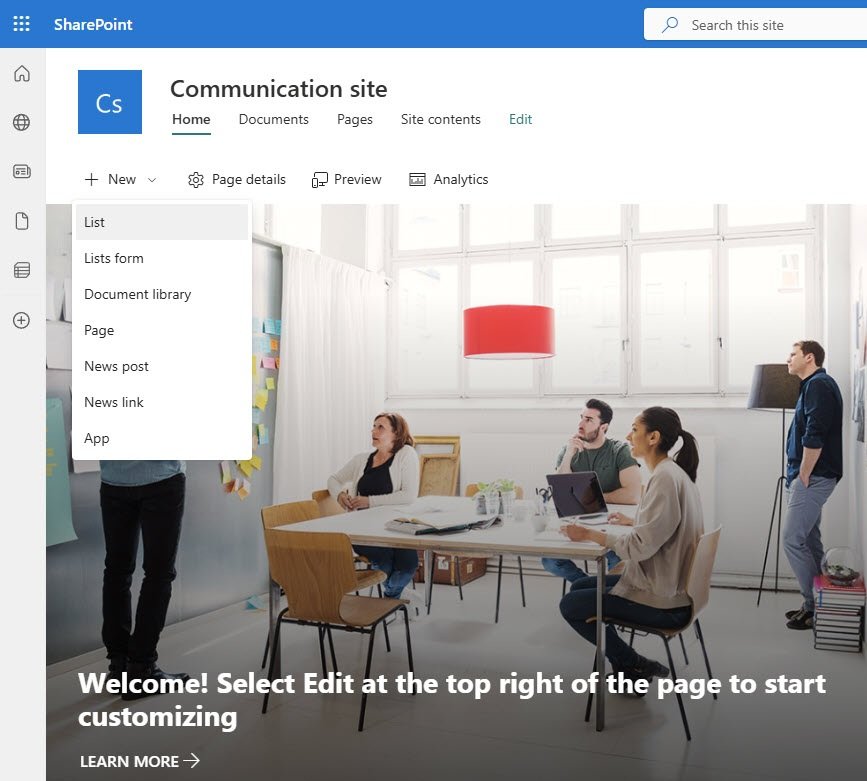
Navigate to the SharePoint root site, click New and select List from the dropdown.
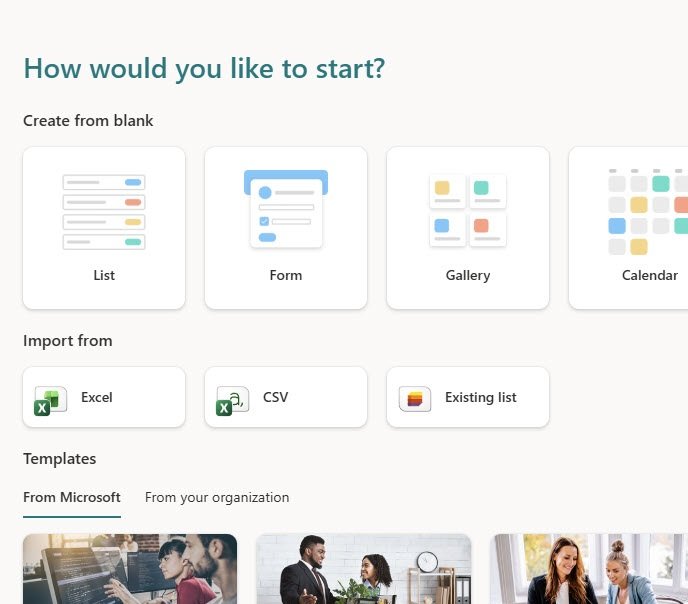
SharePoint offers several ways to start, select the blank List option under “Create from blank” rather than importing from Excel or using a template. A template will be used in the next step but only as a starting point for the structure.
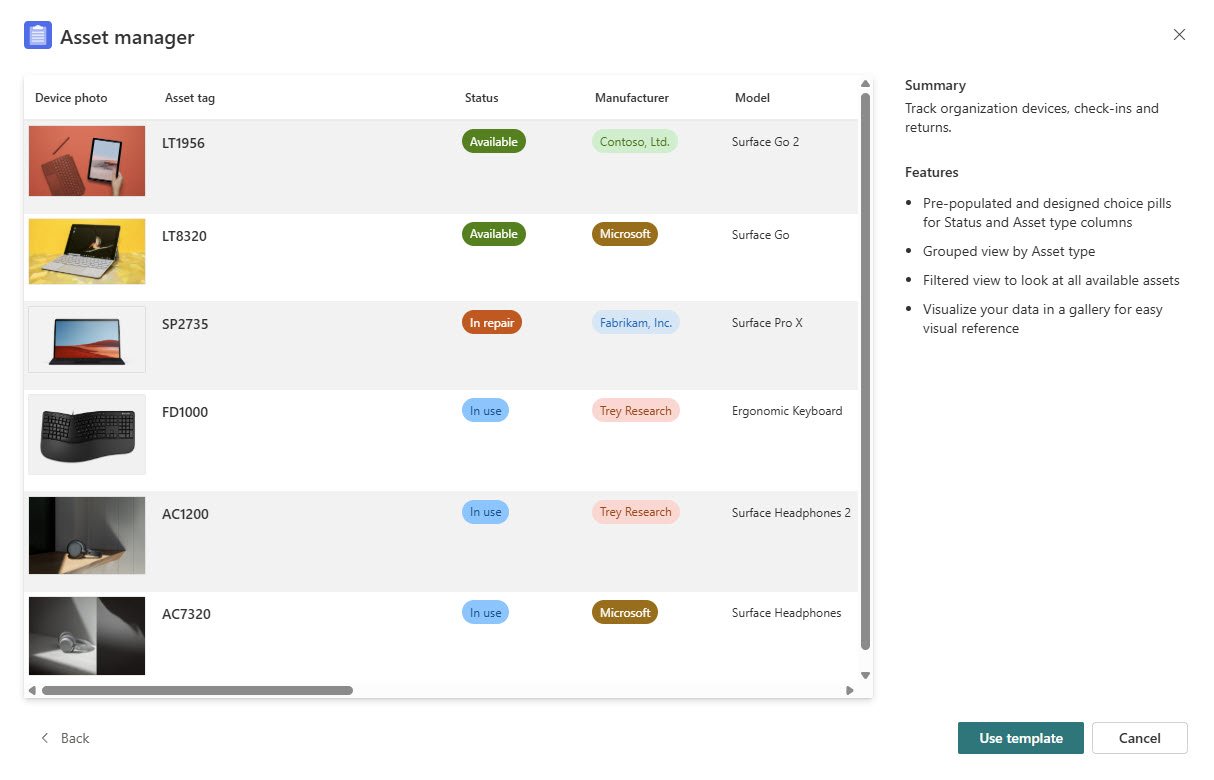
SharePoint’s Asset manager template is a convenient starting point because it already includes a Status column with color coded choice values, which is exactly what this list needs. Select it and click Use template.
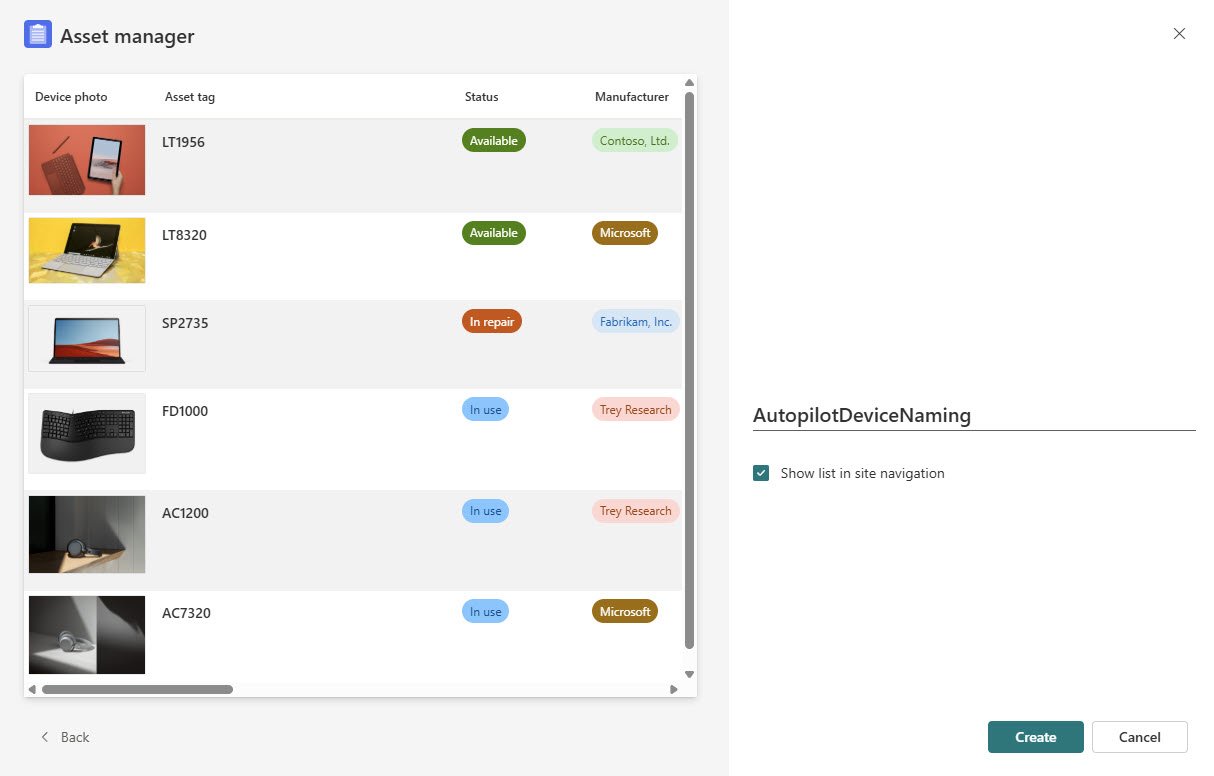
Name the list AutopilotDeviceNaming and leave “Show list in site navigation” checked so it appears in the top navigation bar for easy access and click create.
The list is now visible in Site contents alongside the other content in the Communication site. The AutopilotDeviceNaming entry shows as type List.

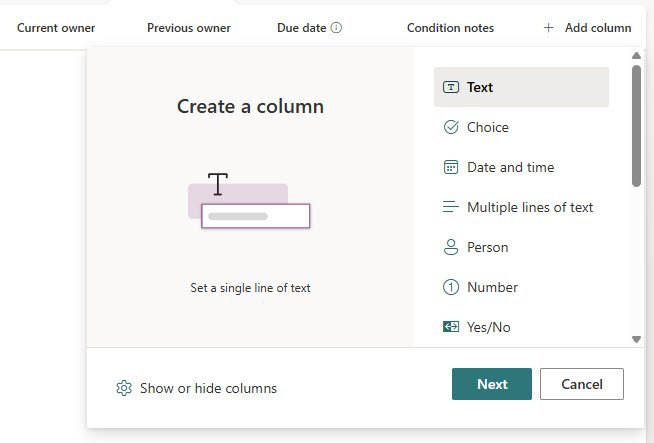
The Asset manager template comes with columns that do not belong here so remove the ones that are not needed and add the ones that are. Each custom column is added using the Create a column panel. Select Text as the type for most columns since all values stored here are plain strings.
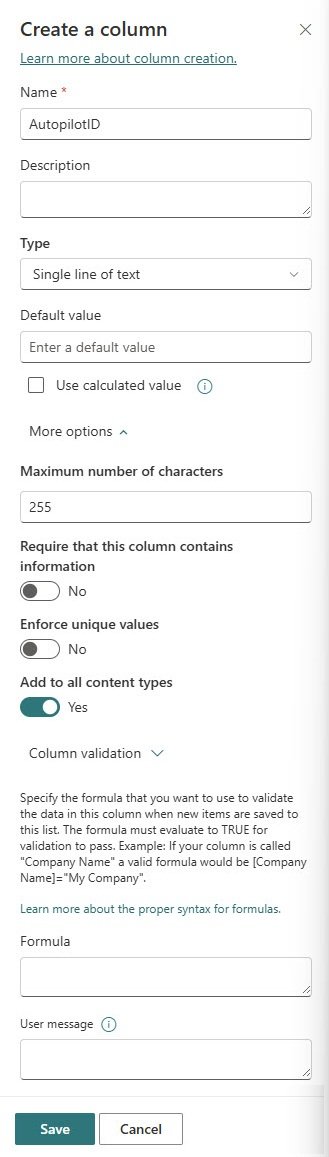
The AutopilotID column is a good example of a standard text column. Name it AutopilotID, leave the type as Single line of text and set the maximum number of characters to 255. No default value is needed since this field is filled automatically by the naming script after it processes the device.
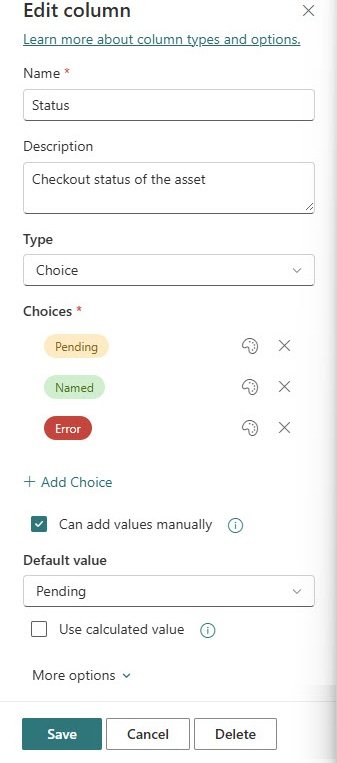
The Status column needs special attention. Unlike the other columns, Status should be set as a Choice type rather than plain text. This gives you the color coded pill values visible throughout the list and prevents any value other than the three defined ones from being entered. Set the choices to Pending, Named and Error and set the default value to Pending so every new row starts in the correct state automatically.
With all columns added and configured, the completed list shows exactly the structure the naming script expects: Status, Serial number, AutopilotID, DeviceType, Department and GeneratedName. The list is empty and ready to receive its first device registration.
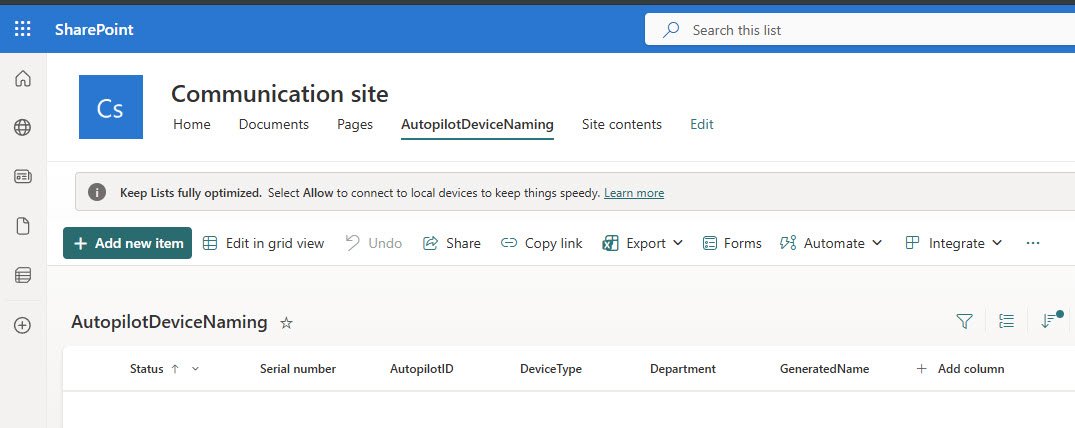
The list is built and the upload script will populate it automatically when the first device goes through WinPE.
In Part 2, the naming engine picks up from there and turns that Pending row into a device name.