Part 2: Autopilot Automated Device Naming: From SharePoint Queue to Sequential Device Names
Table of Contents
Before We Begin
This is Part 2 of a two-part series on automated Autopilot device naming. Part 1 covers the WinPE side, the custom ISO build, the hash capture process, the device registration scripts and how the SharePoint queue entry gets created automatically at upload time.
If you landed here directly start with Part 1 first, it will make everything here click into place much faster.
Creating the App Registration
The naming engine runs completely unattended with no interactive session, so it needs its own identity to talk to Microsoft Graph and that means an App Registration in Entra ID.
Rather than clicking through the portal, the registration was created directly from PowerShell using the Microsoft Graph SDK. A single “New-MgApplication” command creates the registration and returns the Application (Client) ID and Object ID immediately, while the Tenant ID is pulled separately with “Get-MgOrganization”. All three values go directly into the configuration block at the top of “Invoke-AutopilotNaming.ps1”.

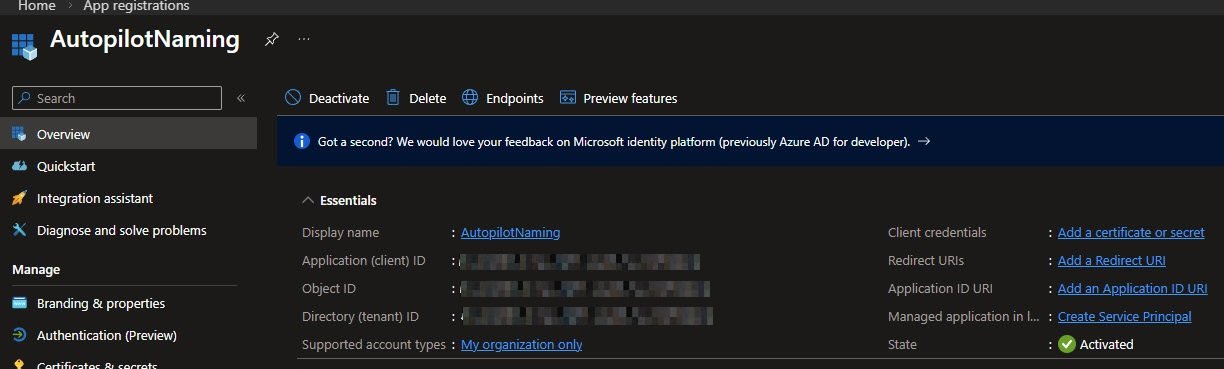
Opening the AutopilotNaming registration in the Entra portal confirms everything looks correct: Display name set, Supported account types limited to the local organisation and State showing Activated. The Application (Client) ID, Object ID and Directory (Tenant) ID are all listed here and are obfuscated for security reasons. The Client credentials field is empty, which is expected since the certificate comes next.
Adding API permissions
With the app registration created, the next step is defining what it is allowed to do. The permissions are added as Application type rather than Delegated since this app runs on a schedule with no signed-in user behind it.
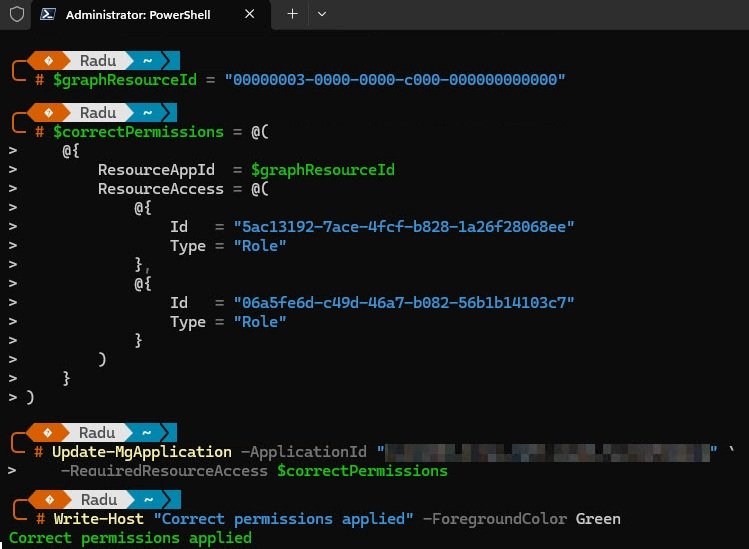
They were applied directly via PowerShell using “Update-MgApplication”, passing the permission GUIDs as Application roles against the Microsoft Graph resource ID.
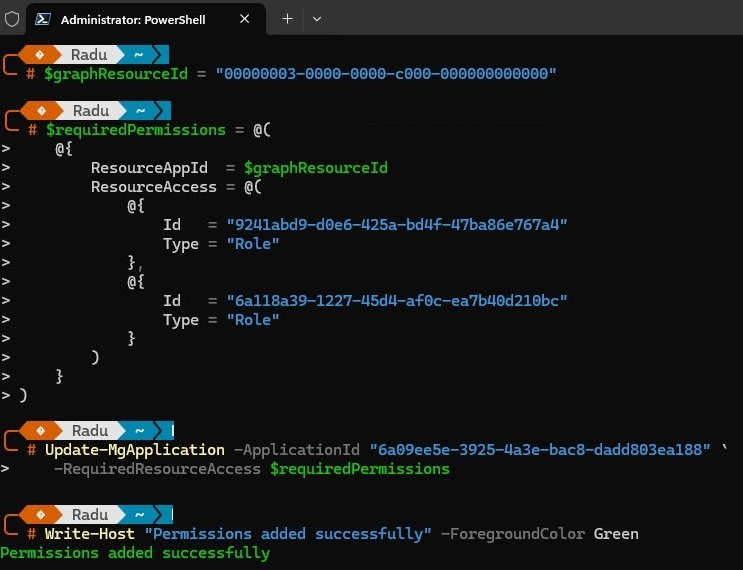
One important thing to verify after applying permissions via PowerShell: the command accepts whatever GUIDs you pass in and reports success regardless of whether they are correct, with no warning and no error. If a GUID resolves to the wrong permission the assignment still succeeds and everything looks fine in the portal.
The only way to catch this is to read the permissions back and resolve them to their actual names. Running the app object through “ConvertTo-Json” shows the raw GUIDs stored on the registration, which is the sanity check to run before granting admin consent.
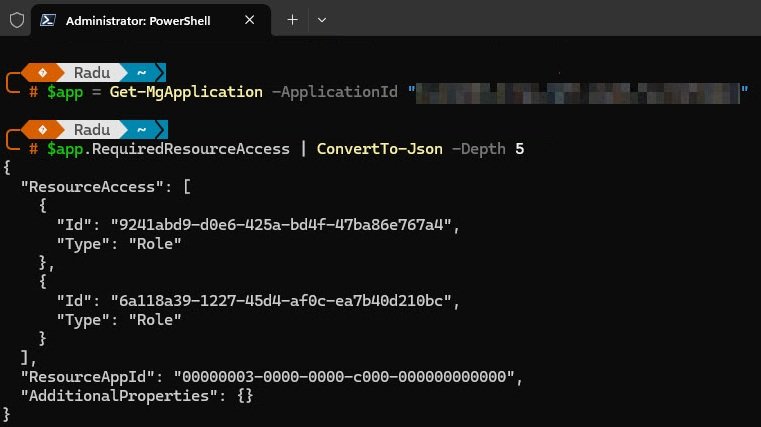
Resolving those GUIDs back to their actual permission names revealed that neither of the two IDs used in the first attempt was correct. One resolved to “Channel.Delete.All” and the other to “DeviceManagementConfiguration.ReadWrite.All”, neither of which has any relevance to Autopilot or SharePoint.
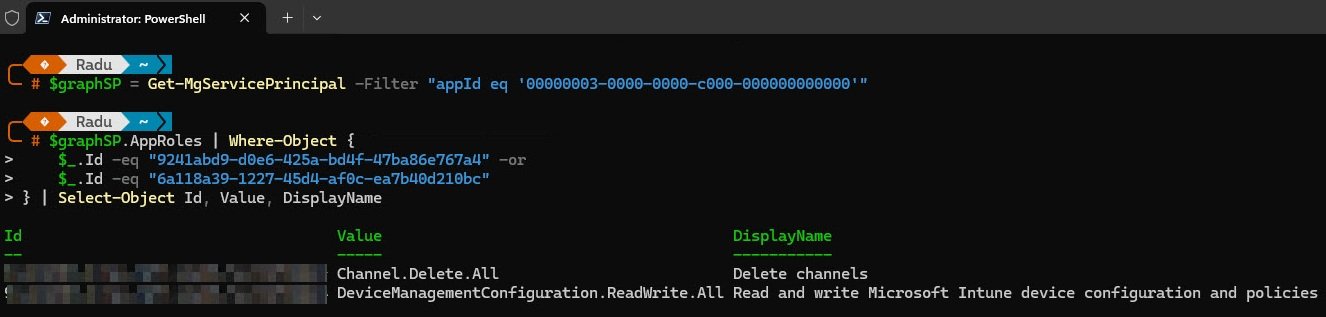
The fix was to query the Microsoft Graph service principal directly, filtering by the exact permission names needed. This returns the correct GUIDs straight from the tenant with no guesswork.
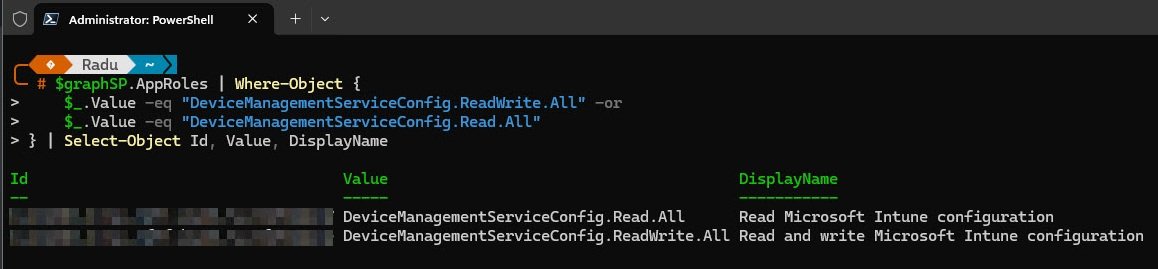
With the correct GUIDs confirmed, “Update-MgApplication” was run again and the output confirmed all four permissions applied correctly.
Opening the API permissions page in the Entra portal confirms the final result: all four permissions listed under Microsoft Graph, all set as Application type and all showing Granted so the app registration is ready.
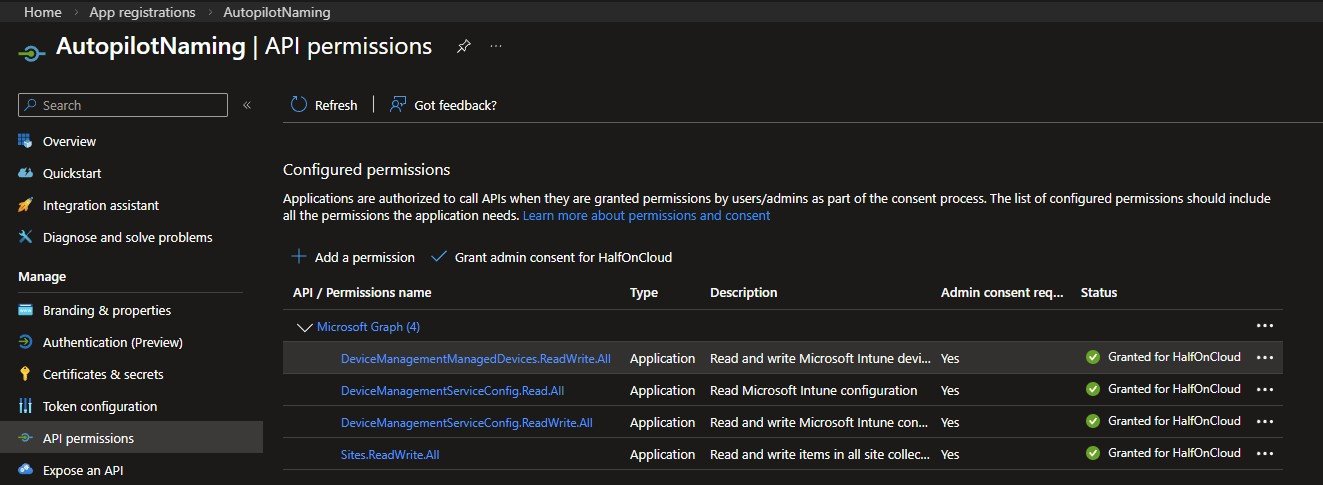
- DeviceManagementManagedDevices.ReadWrite.All to read and update Autopilot device properties
- DeviceManagementServiceConfig.Read.All to read Autopilot configuration
- DeviceManagementServiceConfig.ReadWrite.All to set Autopilot device display names
- Sites.ReadWrite.All to read and write the SharePoint list
Note: When adding permissions via PowerShell, always resolve permission GUIDs directly from your own tenant rather than copying them from online examples. GUIDs can vary and an incorrect one may appear to apply successfully while resolving to a completely different permission.
Creating the self-signed certificate
The app registration now exists and has its permissions but it has no way to prove its identity yet. Rather than using a client secret, which is just a password that can be copied and reused from anywhere, the authentication is handled by a self-signed certificate. The private key never leaves the machine and is marked non-exportable, which means even someone with local administrator access cannot simply export it and use it elsewhere.
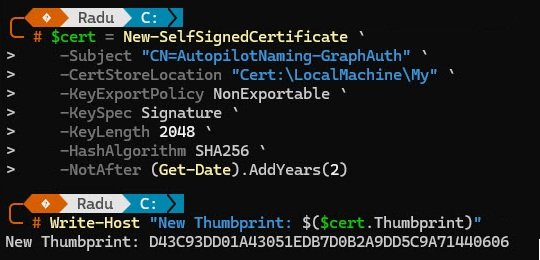
The certificate is created with New-SelfSignedCertificate and stored directly in the “Cert:\LocalMachine\My” store. The subject name, key length, hash algorithm and expiry are all set explicitly. When the command completes it returns the new thumbprint, which goes straight into the configuration block of Invoke-AutopilotNaming.ps1.
Run this on the machine that will run the scheduled task:
# Create certificate valid for 2 years
$cert = New-SelfSignedCertificate `

    -Subject "CN=AutopilotNaming" `
    -CertStoreLocation "Cert:\LocalMachine\My" `
    -KeyExportPolicy NonExportable `
    -KeySpec Signature `
    -KeyLength 2048 `
    -HashAlgorithm SHA256 `
    -NotAfter (Get-Date).AddYears(2)

Write-Host "Thumbprint: $($cert.Thumbprint)"

# Export the public key (.cer) for upload to Entra
Export-Certificate -Cert $cert -FilePath "C:\AutopilotNaming\AutopilotNaming.cer" -Type CERT
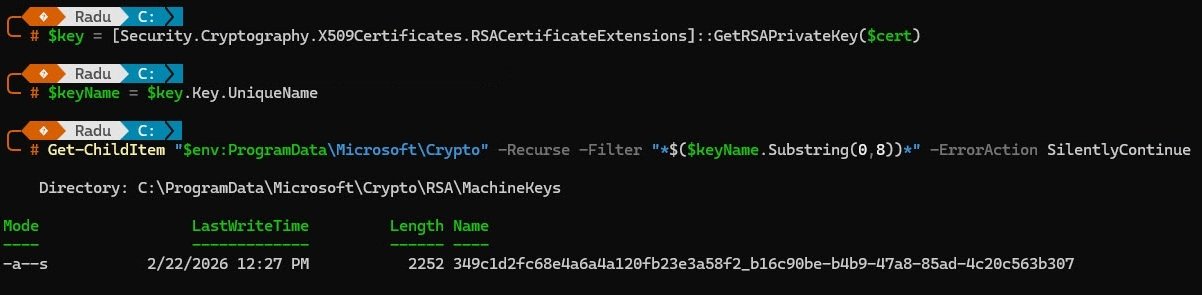
Note: The certificate must be created in “Cert:\LocalMachine\My”, not “Cert:\CurrentUser\My”. When created in the user store, the private key lands under your user profile in a location the SYSTEM account cannot read. The scheduled task runs as SYSTEM, so authentication fails silently. The LocalMachine store places the key in ProgramData\Microsoft\Crypto\RSA\MachineKeys where SYSTEM has access by default.
During an earlier attempt the certificate was created in the current user store instead of the LocalMachine store. Windows accepted the command without complaint and the certificate looked perfectly valid in “certmgr.msc”. The problem only surfaced when the scheduled task ran as SYSTEM and could not find the certificate, because SYSTEM has no access to the current user’s personal store. The private key was sitting in AppData under a path tied to the user SID, completely invisible to any other account.
Attempting to export the certificate as a PFX to move it to the correct store failed immediately with “Cannot export non-exportable private key.” The “NonExportable” policy is exactly what you want for security reasons but it also means there is no way to migrate it. The only fix was to delete it and start over with the correct store location.
Running “New-SelfSignedCertificate” again with “Cert:\LocalMachine\My” as the store location, a quick verification confirms the private key landed in “C:\ProgramData\Microsoft\Crypto\RSA\MachineKeys” where SYSTEM and any other process on the machine can reach it.
Exporting and uploading the certificate
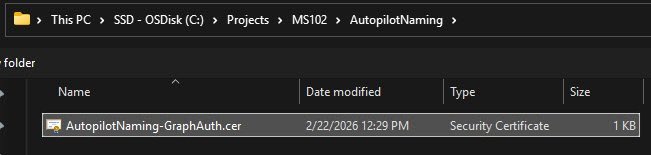
The certificate exists in the local store but Entra ID has no knowledge of it yet. What gets uploaded to the app registration is not the full certificate with its private key, but only the public key exported as a “.cer” file. Entra ID uses this to verify the app’s identity when it authenticates.
“Export-Certificate” exports only the public key from the LocalMachine store to the project folder. The private key stays on the machine, non-exportable, exactly where it should be.
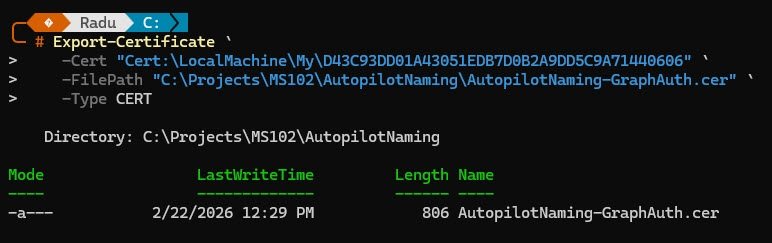
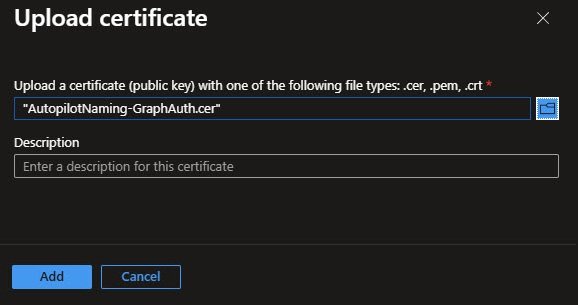
With the “.cer” file ready, open the AutopilotNaming app registration in Entra, go to Certificates & secrets and upload it.
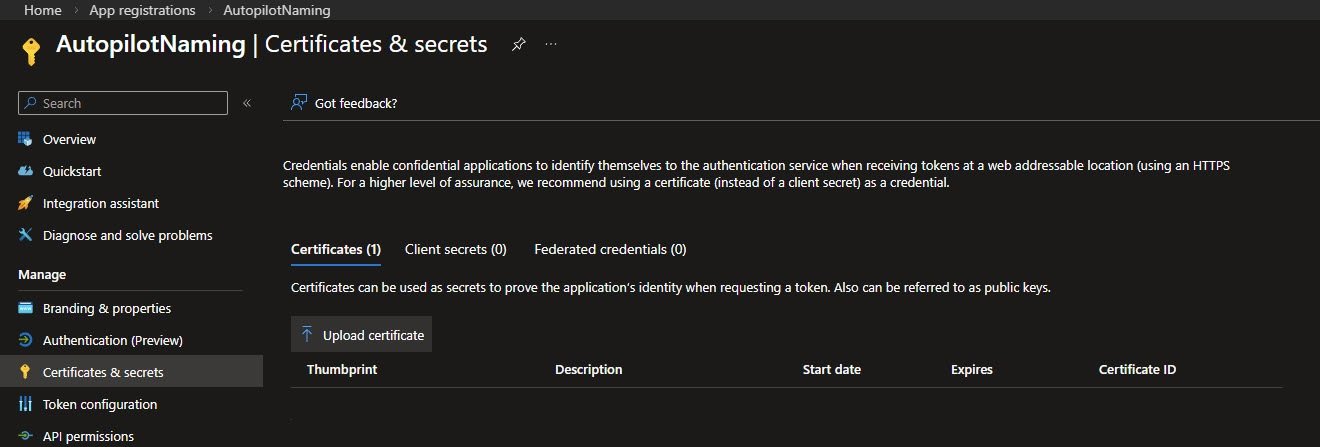
The file contains only the public key.
The portal confirms the upload completed successfully.
The Certificates tab confirms the certificate is registered against the app registration, valid from February 2026 through February 2028 and ready to use.

Recording the proper values
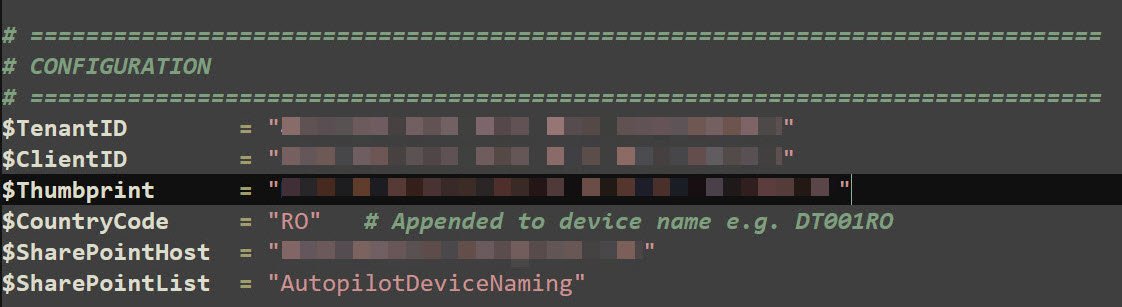
With the app registration created, permissions granted and certificate uploaded, the last step is dropping the configuration values into the block at the top of “Invoke-AutopilotNaming.ps1”. This is the only place in the entire solution where tenant-specific values live.
$TenantID, $ClientID and $Thumbprint come from what was captured earlier. $CountryCode is hardcoded to RO since this tenant is Romania-only and gets appended to every generated name, producing names like DT001RO and LPT002RO. $SharePointHost is the SharePoint root URL and $SharePointList is the name of the list created in Part 1.
With these six values in place the script knows who it is, how to authenticate and where to look for work.
Invoke-AutopilotNaming.ps1
With the app registration created, permissions granted and certificate in place, this is the script that puts it all to work. It runs on a separate machine as a scheduled task every 15 minutes, reads the Pending rows from SharePoint, looks up each device in Autopilot, generates the next sequential name and writes the result back. Because it uses certificate-based authentication, it needs no human interaction and leaves no stored password anywhere.
# =============================================================================
# Invoke-AutopilotNaming.ps1
# Automated Autopilot device naming via SharePoint list + Graph API
#
# Flow:
#   1. Authenticate to Graph using certificate (unattended)
#   2. Read SharePoint list rows where Status = Pending
#   3. For each row, find the Autopilot device by serial number
#   4. Generate next sequential name (e.g. DT001RO, LPT002RO)
#   5. Set displayName via updateDeviceProperties
#   6. Update SharePoint row with GeneratedName + Status = Named
#
# Usage:
#   Normal run : PowerShell -ExecutionPolicy Bypass -File ".\Invoke-AutopilotNaming.ps1"
#   Debug mode : PowerShell -ExecutionPolicy Bypass -File ".\Invoke-AutopilotNaming.ps1" -DebugFields
#
# Author : Radu @ devworkplace.cloud
# Version: 1.1
# =============================================================================
param(
    [switch]$DebugFields   # Dump raw SharePoint field names and exit - use once to discover column names
)

# =============================================================================
# CONFIGURATION
# =============================================================================
$TenantID        = "<your-tenantID-here>"
$ClientID        = "<your-clientID-here>"
$Thumbprint 	 = "<your-certificate-thumbprint-here>"
$CountryCode     = "RO"   # Appended to device name e.g. DT001RO
$SharePointHost  = "<your-SharePoint-Host-here>"
$SharePointList  = "AutopilotDeviceNaming"

# SharePoint internal field names - run with -DebugFields once to discover these
$FieldSerial     = "SerialNumber"   # <-- verify with -DebugFields
$FieldDeviceType = "DeviceType"
$FieldDepartment = "Department"
$FieldStatus     = "Status"
$FieldGenName    = "GeneratedName"
$FieldApID       = "AutopilotID"

$LogDir  = "C:\AutopilotNaming\Logs"
$LogPath = "$LogDir\AutopilotNaming_$(Get-Date -Format 'yyyyMMdd_HHmmss').log"

# =============================================================================
# LOGGING
# =============================================================================
if (-not (Test-Path $LogDir)) { New-Item -ItemType Directory -Path $LogDir -Force | Out-Null }

function Write-Log {
    param(
        [string]$Message,
        [ValidateSet("INFO","SUCCESS","WARNING","ERROR")]
        [string]$Level = "INFO"
    )
    $timestamp = Get-Date -Format "yyyy-MM-dd HH:mm:ss"
    $entry     = "[$timestamp] [$Level] $Message"
    Add-Content -Path $LogPath -Value $entry
    switch ($Level) {
        "SUCCESS" { Write-Host $entry -ForegroundColor Green }
        "WARNING" { Write-Host $entry -ForegroundColor Yellow }
        "ERROR"   { Write-Host $entry -ForegroundColor Red }
        default   { Write-Host $entry -ForegroundColor Cyan }
    }
}

# =============================================================================
# AUTHENTICATE TO GRAPH USING CERTIFICATE (UNATTENDED / CNG-COMPATIBLE)
# =============================================================================
function Get-GraphToken {
    Write-Log "Authenticating to Microsoft Graph using certificate..."
    try {
        $cert = Get-ChildItem Cert:\LocalMachine\My | Where-Object { $_.Thumbprint -eq $Thumbprint }
        if (-not $cert) { throw "Certificate not found in LocalMachine\My. Thumbprint: $Thumbprint" }

        $audience = "https://login.microsoftonline.com/$TenantID/oauth2/v2.0/token"
        $now      = [DateTimeOffset]::UtcNow.ToUnixTimeSeconds()

        $header = [Convert]::ToBase64String(
            [Text.Encoding]::UTF8.GetBytes(
                (ConvertTo-Json @{ alg="RS256"; typ="JWT"; x5t=[Convert]::ToBase64String($cert.GetCertHash()) } -Compress)
            )
        ).TrimEnd('=').Replace('+','-').Replace('/','_')

        $claims = [Convert]::ToBase64String(
            [Text.Encoding]::UTF8.GetBytes(
                (ConvertTo-Json @{ aud=$audience; exp=$now+3600; iss=$ClientID; jti=[Guid]::NewGuid().ToString(); nbf=$now; sub=$ClientID } -Compress)
            )
        ).TrimEnd('=').Replace('+','-').Replace('/','_')

        $rsa = [Security.Cryptography.X509Certificates.RSACertificateExtensions]::GetRSAPrivateKey($cert)
        $sig = [Convert]::ToBase64String(
            $rsa.SignData(
                [Text.Encoding]::UTF8.GetBytes("$header.$claims"),
                [Security.Cryptography.HashAlgorithmName]::SHA256,
                [Security.Cryptography.RSASignaturePadding]::Pkcs1
            )
        ).TrimEnd('=').Replace('+','-').Replace('/','_')

        $response = Invoke-RestMethod -Method Post -Uri $audience `
            -ContentType "application/x-www-form-urlencoded" `
            -Body @{
                client_id             = $ClientID
                client_assertion_type = "urn:ietf:params:oauth:client-assertion-type:jwt-bearer"
                client_assertion      = "$header.$claims.$sig"
                scope                 = "https://graph.microsoft.com/.default"
                grant_type            = "client_credentials"
            }

        Write-Log "Authentication successful." -Level SUCCESS
        return $response.access_token

    } catch {
        Write-Log "Authentication failed: $_" -Level ERROR
        exit 1
    }
}

# =============================================================================
# GRAPH API HELPER
# =============================================================================
function Invoke-GraphRequest {
    param(
        [string]$Uri,
        [string]$Method = "GET",
        [hashtable]$Headers,
        [string]$Body
    )
    $params = @{ Uri=$Uri; Method=$Method; Headers=$Headers }
    if ($Body) { $params["Body"]=$Body; $params["ContentType"]="application/json" }
    return Invoke-RestMethod @params
}

# =============================================================================
# GET SHAREPOINT SITE ID + LIST ID
# =============================================================================
function Get-SharePointIds {
    param([hashtable]$Headers)

    Write-Log "Resolving SharePoint site and list IDs..."

    $site   = Invoke-GraphRequest -Uri "https://graph.microsoft.com/v1.0/sites/$SharePointHost" -Headers $Headers
    $siteId = $site.id
    Write-Log "Site ID : $siteId"

    $lists  = Invoke-GraphRequest -Uri "https://graph.microsoft.com/v1.0/sites/$siteId/lists" -Headers $Headers
    $list   = $lists.value | Where-Object { $_.displayName -eq $SharePointList }
    if (-not $list) { throw "List '$SharePointList' not found in SharePoint site." }
    $listId = $list.id
    Write-Log "List ID : $listId"

    return $siteId, $listId
}

# =============================================================================
# DEBUG MODE - DUMP ALL FIELD NAMES FROM FIRST LIST ITEM
# Run once with: .\Invoke-AutopilotNaming.ps1 -DebugFields
# Copy the internal names into the $Field* variables above
# =============================================================================
function Show-FieldNames {
    param([hashtable]$Headers, [string]$SiteId, [string]$ListId)

    Write-Log "DEBUG MODE: Dumping SharePoint field names..." -Level WARNING

    $response = Invoke-GraphRequest `
        -Uri "https://graph.microsoft.com/v1.0/sites/$SiteId/lists/$ListId/items?`$expand=fields&`$top=5" `
        -Headers $Headers

    if ($response.value.Count -eq 0) {
        Write-Log "No items in list. Add at least one row first." -Level ERROR
        return
    }

    Write-Host ""
    Write-Host "======= RAW SHAREPOINT FIELD NAMES =======" -ForegroundColor Magenta
    $response.value[0].fields.PSObject.Properties | ForEach-Object {
        Write-Host ("  {0,-45} = {1}" -f $_.Name, $_.Value) -ForegroundColor White
    }
    Write-Host "===========================================" -ForegroundColor Magenta
    Write-Host ""
    Write-Host "Update the `$Field* variables at the top of the script with the correct internal names." -ForegroundColor Yellow
    Write-Host ""
}

# =============================================================================
# GET PENDING DEVICES FROM SHAREPOINT
# =============================================================================
function Get-PendingDevices {
    param([hashtable]$Headers, [string]$SiteId, [string]$ListId)
    $response = Invoke-GraphRequest `
        -Uri "https://graph.microsoft.com/v1.0/sites/$SiteId/lists/$ListId/items?`$expand=fields" `
        -Headers $Headers
    # Filter in PowerShell - avoids OData filter issues with custom SharePoint columns via Graph
    $pending = @($response.value | Where-Object { $_.fields.$FieldStatus -eq 'Pending' })
    Write-Log "Found $($pending.Count) pending device(s)." -Level INFO
    return $pending
}

# =============================================================================
# FIND AUTOPILOT DEVICE BY SERIAL NUMBER
# =============================================================================
function Get-AutopilotDevice {
    param([hashtable]$Headers, [string]$SerialNumber)

    Write-Log "Searching Autopilot for serial: $SerialNumber"

    # OData filter breaks on VMware serial numbers (spaces, special chars)
    # Retrieve all and match in PowerShell instead
    $response = Invoke-GraphRequest `
        -Uri "https://graph.microsoft.com/v1.0/deviceManagement/windowsAutopilotDeviceIdentities" `
        -Headers $Headers

    $match = $response.value | Where-Object { $_.serialNumber -eq $SerialNumber }

    if (-not $match) {
        Write-Log "Not found in Autopilot yet - will retry next scheduled run." -Level WARNING
        return $null
    }

    Write-Log "Found Autopilot device: $($match.id)" -Level SUCCESS
    return $match
}

# =============================================================================
# GENERATE NEXT SEQUENTIAL DEVICE NAME
# Checks both SharePoint Named rows AND existing Autopilot displayNames
# to prevent conflicts even if list drifts out of sync
# =============================================================================
function Get-NextDeviceName {
    param([hashtable]$Headers, [string]$DeviceType, [string]$SiteId, [string]$ListId)

    $pattern = "^$DeviceType(\d{3})$CountryCode$"

    # Numbers already used in SharePoint (Named rows)
    $allItems  = Invoke-GraphRequest `
        -Uri "https://graph.microsoft.com/v1.0/sites/$SiteId/lists/$ListId/items?`$expand=fields" `
        -Headers $Headers

    $spNumbers = $allItems.value |
        Where-Object  { $_.fields.$FieldStatus -eq 'Named' } |
        ForEach-Object { $_.fields.$FieldGenName } |
        Where-Object  { $_ -match $pattern } |
        ForEach-Object { [int]($_ -replace $pattern, '$1') }

    # Numbers already used in Autopilot (displayName)
    $apResponse = Invoke-GraphRequest `
        -Uri "https://graph.microsoft.com/v1.0/deviceManagement/windowsAutopilotDeviceIdentities" `
        -Headers $Headers

    $apNumbers = $apResponse.value |
        ForEach-Object { $_.displayName } |
        Where-Object  { $_ -match $pattern } |
        ForEach-Object { [int]($_ -replace $pattern, '$1') }

		$allNumbers = (@($spNumbers) + @($apNumbers)) | Where-Object { $_ -ne $null } | ForEach-Object { [int]$_ }
		$nextNumber = if ($allNumbers.Count -eq 0) { 1 } else { ($allNumbers | Measure-Object -Maximum).Maximum + 1 }
		$name = "{0}{1:D3}{2}" -f $DeviceType, [int]$nextNumber, $CountryCode
    Write-Log "Generated name: $name" -Level SUCCESS
    return $name
}

# =============================================================================
# SET AUTOPILOT DEVICE DISPLAY NAME VIA updateDeviceProperties
# =============================================================================
function Set-AutopilotDeviceName {
    param([hashtable]$Headers, [string]$DeviceId, [string]$DisplayName)

    Write-Log "Setting displayName '$DisplayName' on Autopilot device $DeviceId..."
    try {
        Invoke-RestMethod `
            -Uri     "https://graph.microsoft.com/v1.0/deviceManagement/windowsAutopilotDeviceIdentities/$DeviceId/updateDeviceProperties" `
            -Method  Post `
            -Headers $Headers `
            -ContentType "application/json" `
            -Body    (ConvertTo-Json @{ displayName = $DisplayName })

        Write-Log "displayName set successfully." -Level SUCCESS
        return $true
    } catch {
        Write-Log "Failed to set displayName: $_" -Level ERROR
        return $false
    }
}

# =============================================================================
# UPDATE SHAREPOINT LIST ITEM STATUS + GENERATED NAME
# Uses PATCH to /items/{id}/fields (simpler than /items/{id} with nested fields)
# =============================================================================
function Update-SharePointItem {
    param(
        [hashtable]$Headers,
        [string]$SiteId,
        [string]$ListId,
        [string]$ItemId,
        [string]$GeneratedName,
        [string]$AutopilotID,
        [string]$Status
    )

    Write-Log "Updating SharePoint item $ItemId -> Status=$Status, Name=$GeneratedName..."
    try {
		Invoke-RestMethod `
            -Uri     "https://graph.microsoft.com/v1.0/sites/$SiteId/lists/$ListId/items/$ItemId/fields" `
            -Method  Patch `
            -Headers $Headers `
            -ContentType "application/json" `
            -Body    (ConvertTo-Json @{
                $FieldStatus  = $Status
                $FieldGenName = $GeneratedName
                $FieldApID    = $AutopilotID
            }) | Out-Null

        Write-Log "SharePoint item updated." -Level SUCCESS
    } catch {
        Write-Log "Failed to update SharePoint item: $_" -Level ERROR
    }
}

# =============================================================================
# MAIN
# =============================================================================
Write-Log "============================================"
Write-Log "  Invoke-AutopilotNaming.ps1 - Starting"
Write-Log "============================================"

$token   = Get-GraphToken
$headers = @{ "Authorization" = "Bearer $token" }

try {
    $siteId, $listId = Get-SharePointIds -Headers $headers
} catch {
    Write-Log "Failed to resolve SharePoint IDs: $_" -Level ERROR
    exit 1
}

# -DebugFields: dump raw SharePoint field names and exit
if ($DebugFields) {
    Show-FieldNames -Headers $headers -SiteId $siteId -ListId $listId
    exit 0
}

$pendingItems = Get-PendingDevices -Headers $headers -SiteId $siteId -ListId $listId

if ($pendingItems.Count -eq 0) {
    Write-Log "No pending devices found. Exiting." -Level WARNING
    exit 0
}

foreach ($item in $pendingItems) {
    $fields  = $item.fields
    $itemId  = $item.id
    $serial  = $fields.$FieldSerial
    $devType = $fields.$FieldDeviceType
    $dept    = $fields.$FieldDepartment

    Write-Log "--------------------------------------------"
    Write-Log "Processing: Serial=$serial | Type=$devType | Dept=$dept"

    if (-not $serial -or -not $devType) {
        Write-Log "Missing Serial or DeviceType - skipping item $itemId" -Level WARNING
        continue
    }

    $autopilotDevice = Get-AutopilotDevice -Headers $headers -SerialNumber $serial
    if (-not $autopilotDevice) { continue }

    $deviceName = Get-NextDeviceName `
        -Headers    $headers `
        -DeviceType $devType `
        -SiteId     $siteId `
        -ListId     $listId

    $success = Set-AutopilotDeviceName `
        -Headers     $headers `
        -DeviceId    $autopilotDevice.id `
        -DisplayName $deviceName

    Update-SharePointItem `
        -Headers       $headers `
        -SiteId        $siteId `
        -ListId        $listId `
        -ItemId        $itemId `
        -GeneratedName $deviceName `
        -AutopilotID   $autopilotDevice.id `
        -Status        $(if ($success) { "Named" } else { "Error" })
}

Write-Log "============================================"
Write-Log "  Invoke-AutopilotNaming.ps1 - Complete"
Write-Log "============================================"
The Scheduled Task
With the app registration configured, the certificate in place and the script ready, the last step is making sure “Invoke-AutopilotNaming.ps1” runs automatically without anyone triggering it manually.
Registering the task
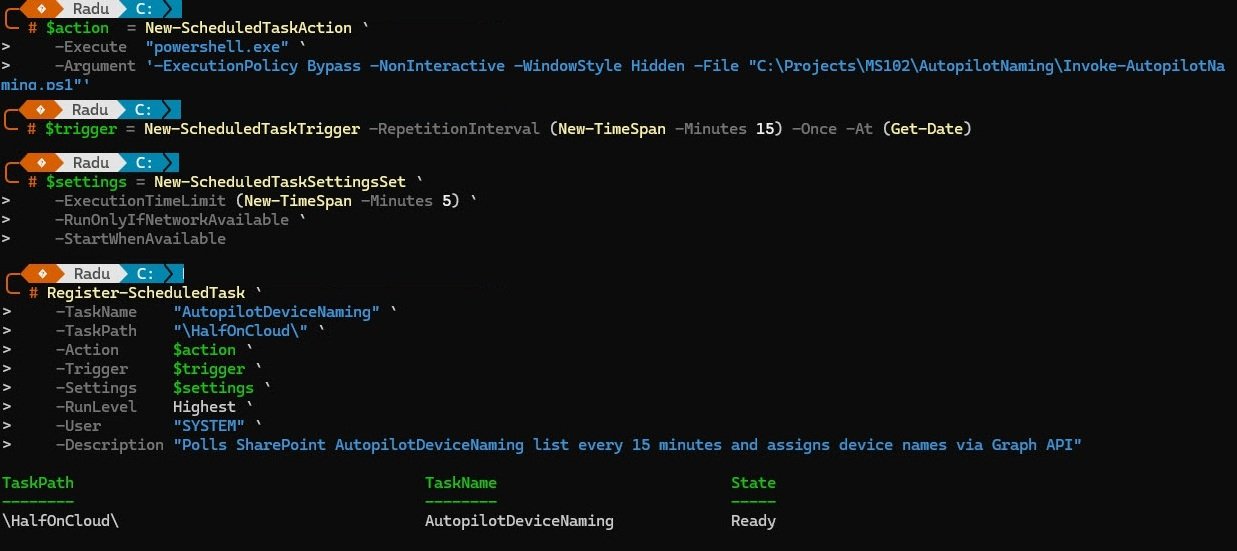
The task is registered entirely from PowerShell using three building blocks: an action that defines what to run, a trigger that defines when and a settings set that controls how it behaves. The action calls powershell.exe with “-ExecutionPolicy Bypass -NonInteractive -WindowStyle Hidden” so it runs silently with no visible window. The trigger fires once immediately then repeats every 15 minutes indefinitely.
The settings enforce a 5 minute execution time limit and require network connectivity before the task starts. The task runs as SYSTEM under a “\HalfOnCloud” folder in Task Scheduler to keep it separate from system tasks.
# Create the scheduled task
$action  = New-ScheduledTaskAction `
    -Execute "powershell.exe" `
    -Argument "-ExecutionPolicy Bypass -NonInteractive -File \"C:\AutopilotNaming\Invoke-AutopilotNaming.ps1\""

$trigger = New-ScheduledTaskTrigger -RepetitionInterval (New-TimeSpan -Minutes 15) -Once -At (Get-Date)
$settings = New-ScheduledTaskSettingsSet -ExecutionTimeLimit (New-TimeSpan -Minutes 5)

Register-ScheduledTask `
    -TaskName "AutopilotNaming" `
    -TaskPath "\HalfOnCloud\" `
    -Action $action `
    -Trigger $trigger `
    -Settings $settings `
    -RunLevel Highest `
    -User "SYSTEM"
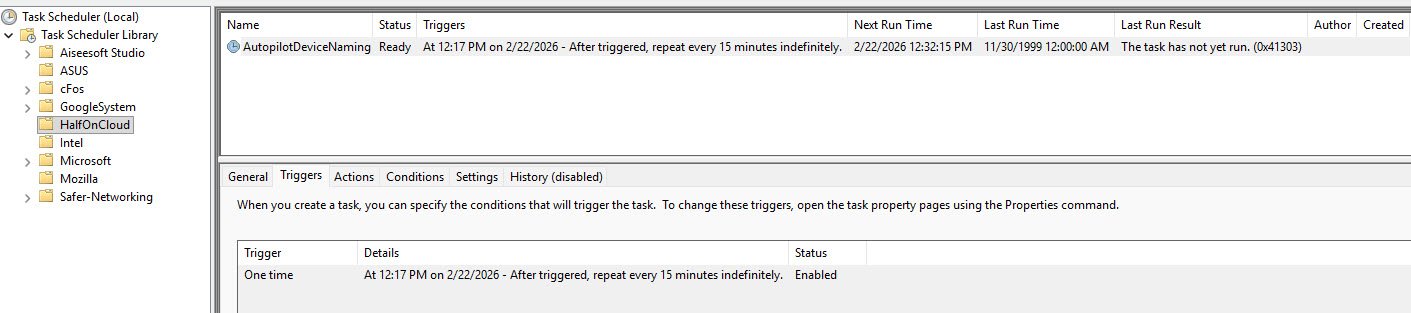
Task Scheduler confirms the task is registered under the HalfOnCloud folder, trigger set to repeat every 15 minutes and status Enabled.
Note: The Last Run Time showing 11/30/1999 is Windows default placeholder for tasks that have never run.
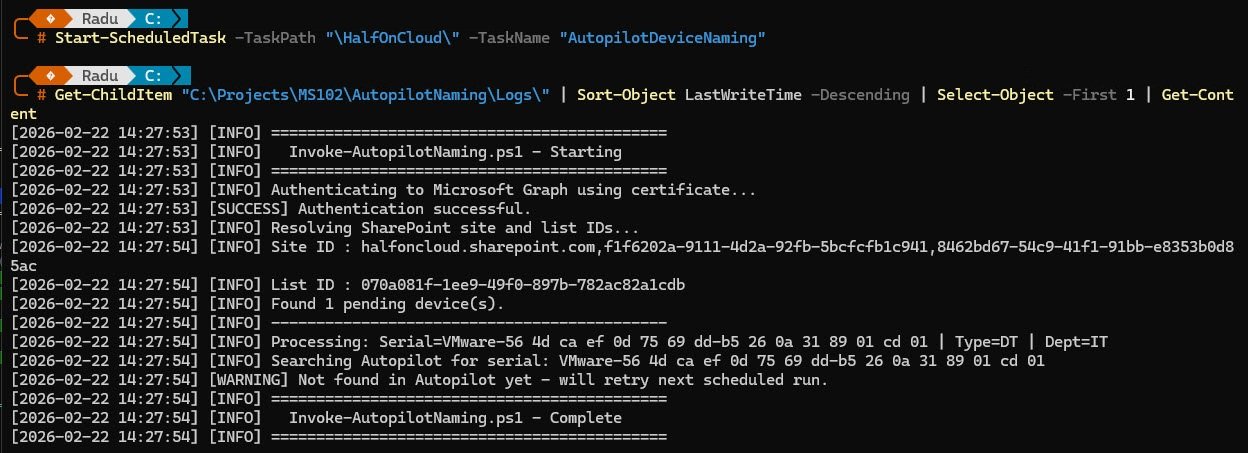
Verifying the first run
Rather than waiting for the 15 minute timer, the task was triggered manually with “Start-ScheduledTask” and checked immediately with “Get-ScheduledTaskInfo”. The result came back as “LastTaskResult = 1”, which in Windows Task Scheduler means the task exited with a warning. A result of 0 means clean success.
Start-ScheduledTask -TaskPath "\HalfOnCloud\" -TaskName "AutopilotNaming"
Get-ScheduledTaskInfo -TaskPath "\HalfOnCloud\" -TaskName "AutopilotNaming" | Select-Object LastRunTime, LastTaskResult, NextRunTime

The log confirms authentication succeeded, SharePoint resolved correctly and one pending device was found, but the Autopilot sync had not completed yet so the device was not visible in Autopilot at that moment. The script identified the device type as DT and department as IT, left the row as Pending to be picked up on the next run and exited with result code 1.
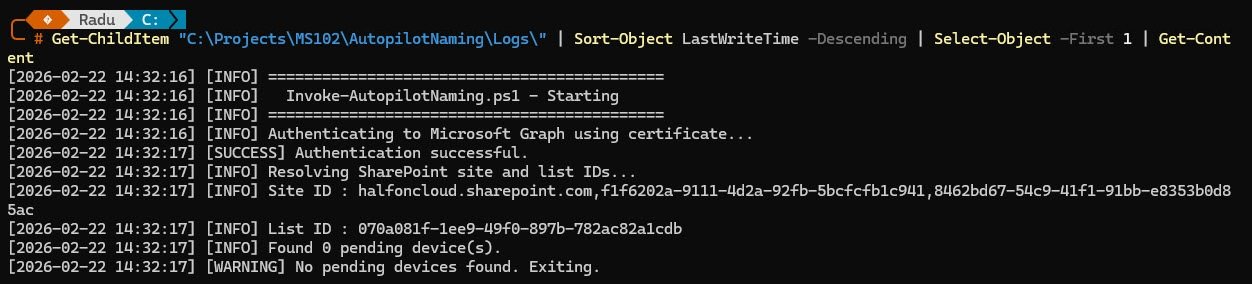
The second run a few minutes later confirms the idle state the script produces when there is nothing to process, with authentication succeeding, SharePoint resolving correctly and zero pending devices found. Everything is working exactly as designed.
Disabling the Built-in Naming Template
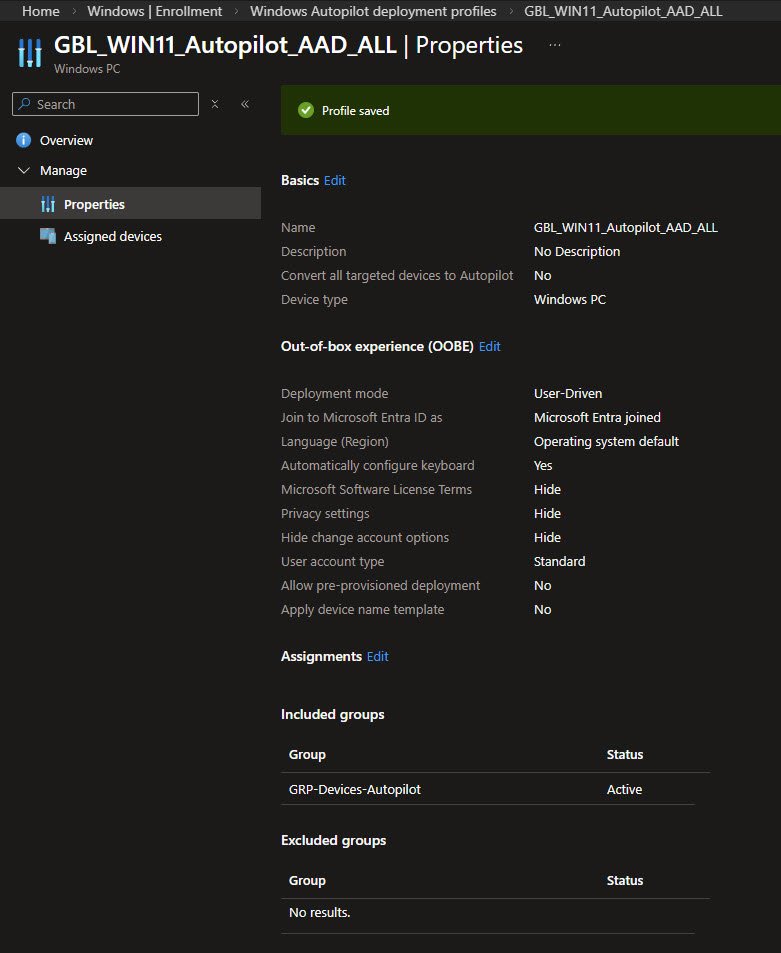
Once everything is working there is one setting in the Autopilot deployment profile that needs attention, otherwise it will interfere with the naming script. The profile initially had “Apply device name template” set to “2026-%SERIAL%” and with that active, Windows applies its own name during OOBE regardless of what the naming script already set on the Autopilot device object.
The fix is straightforward, navigate to Intune, Devices, Enrollment, Windows Autopilot deployment profiles, open the profile, go to OOBE settings and set “Apply device name template” to “No”. This hands full control of device naming to the script where it belongs.
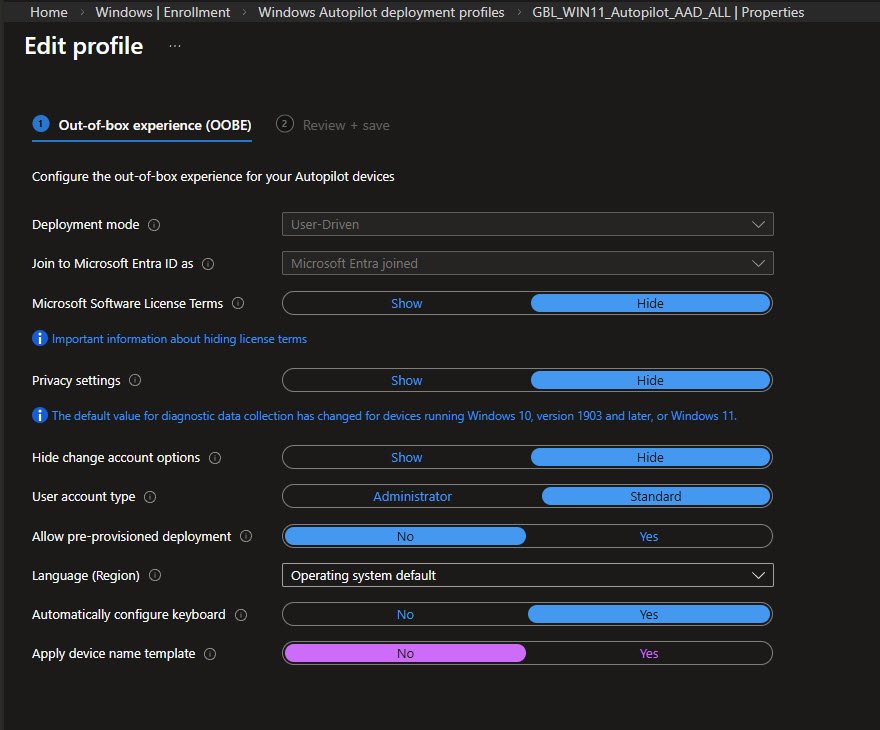
Disabling the template removes the conflict. The naming script now has full control and two outcomes are possible: if it runs before OOBE completes the device gets the correct sequential name, if it does not the device gets a generic “DESKTOP-XXXXXX” name, which is an immediate visual signal that something needs attention.
A “2026-%SERIAL%” name stands out immediately as wrong and means the counter has already moved on, leaving that device outside the naming convention permanently.
The Solution in Action
WinPE end-to-end run
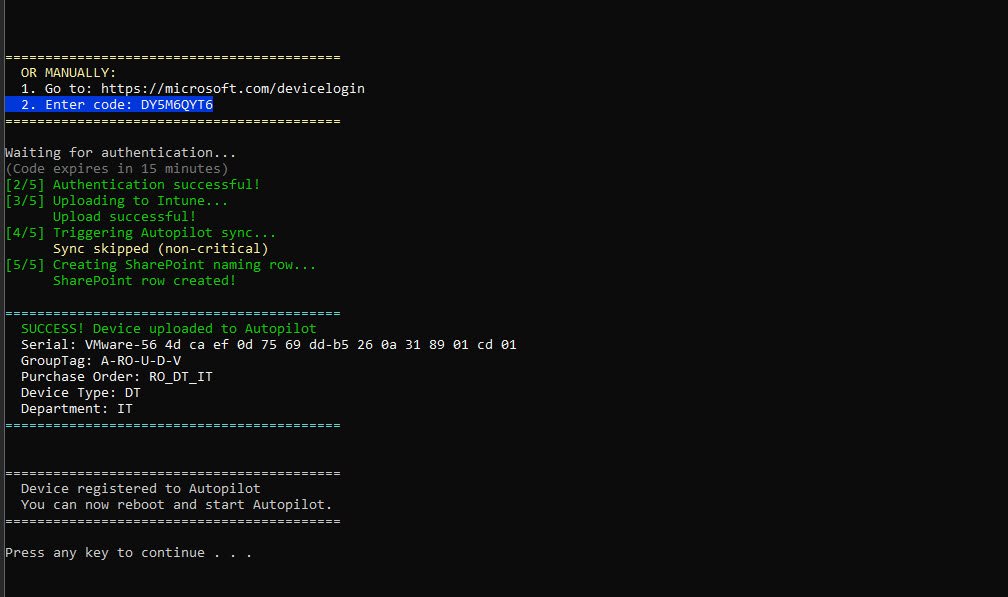
This is where everything comes together, the WinPE environment boots from the custom ISO, the technician runs “CaptureHash.cmd” and the registration process executes in sequence.
The script initialises the network first, then attempts to auto-detect the chassis type via WMI. On this VM the chassis type code comes back as 1, which means “Other” and cannot be mapped automatically. The script falls back to a manual selection menu where the technician selects Desktop and IT department. From those two choices the script builds the purchaseOrderIdentifier as “RO_DT_IT” and hands off to the upload script.
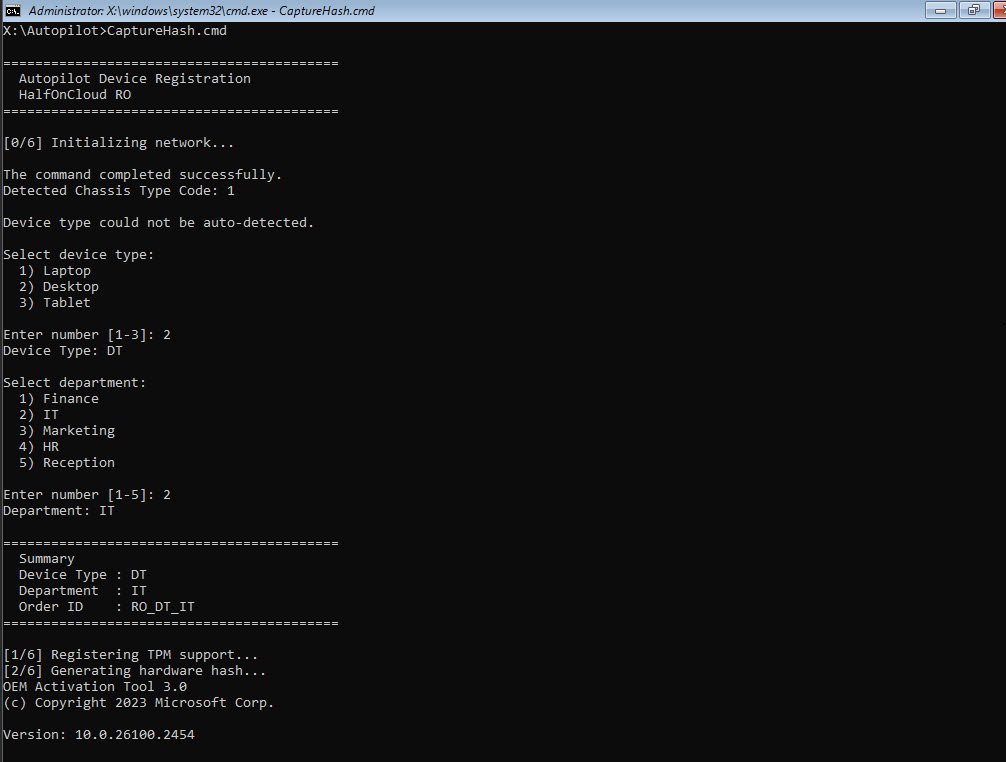
The OA3 Activation Tool completes successfully and the serial number is retrieved via WMI fallback since VMware leaves the SMBIOS serial number field empty. The upload script requests a device code from Microsoft and renders it as a QR code directly in the terminal. The technician scans it with their phone, authenticates and the script continues automatically. For anyone who prefers not to scan, the manual URL and code are displayed below the QR code.
The QR code feature was added after someone in the LinkedIn community suggested it would reduce technician error during large batch deployments. One thing worth knowing: Microsoft deliberately does not auto-fill the device code when scanning to prevent phishing abuse, so the technician still needs to type the 9 character code after scanning. The QR code gets them to the right page instantly, which is the meaningful time saving in a WinPE environment with no mouse and no clipboard.
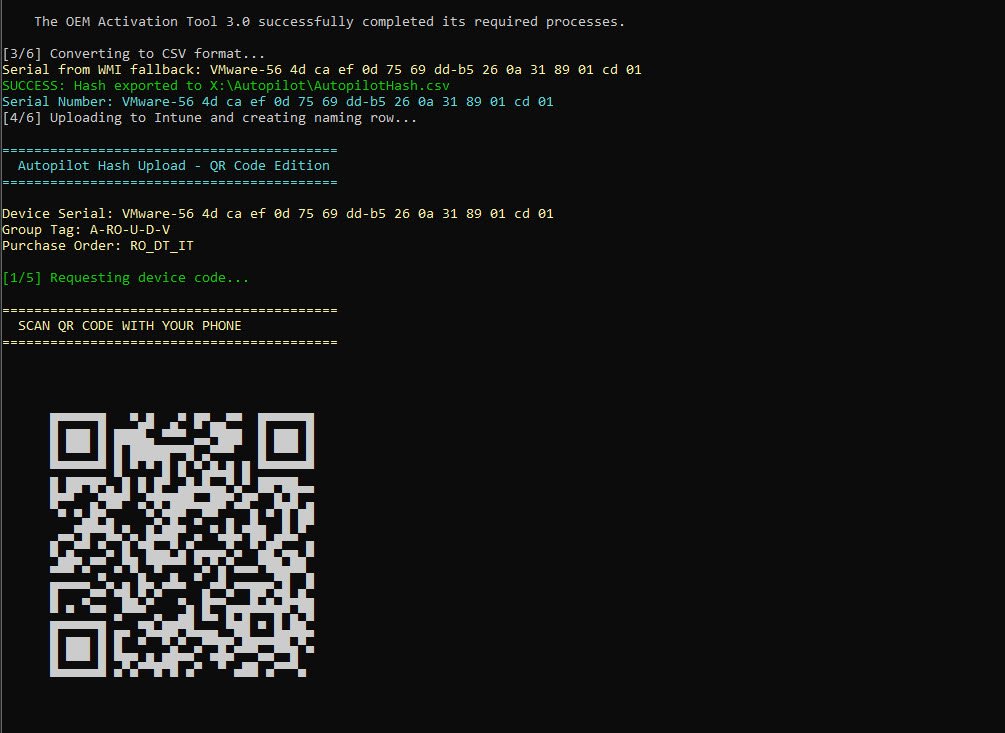
All five steps complete successfully, with the hash uploaded to Intune, GroupTag “A-RO-U-D-V” and purchaseOrderIdentifier “RO_DT_IT” set on the Autopilot device object and the SharePoint naming row created automatically as the final step. The device is registered and the technician presses any key to continue installing the OS and start the Autopilot process.
The results
The SharePoint List
With the WinPE session complete and the device rebooted into OOBE, the naming script is running on its 15 minute cycle in the background and the SharePoint list reflects exactly what is happening at any given moment, serving as both a live status board and a permanent audit log.
The Pending row is the device just registered via WinPE, waiting for the naming script to pick it up on its next run. The AutopilotID column is empty because the Autopilot sync has not completed yet.
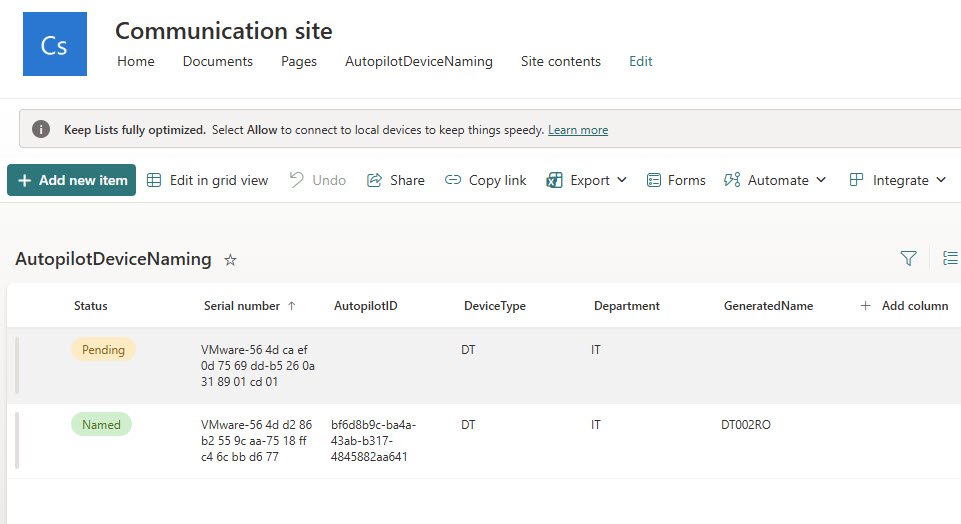
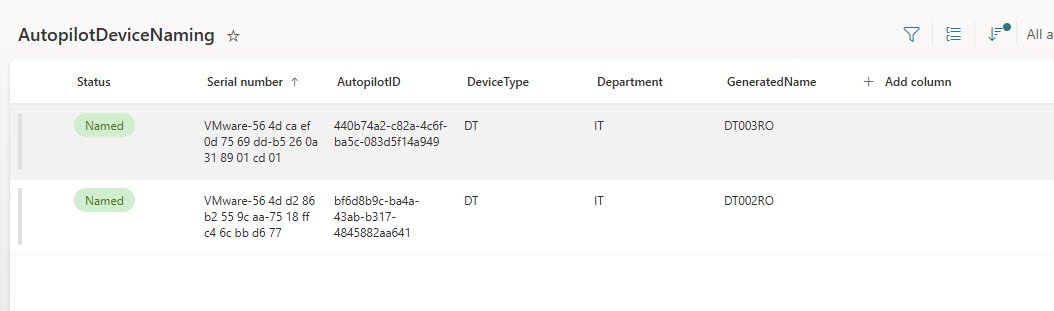
On the next scheduled run the naming script found the pending device in Autopilot, generated the next sequential name in the DT series and updated both the Autopilot device object and the SharePoint row. The device is now showing Status Named with DT003RO generated, AutopilotID filled in and the sequence intact, all without any manual intervention.
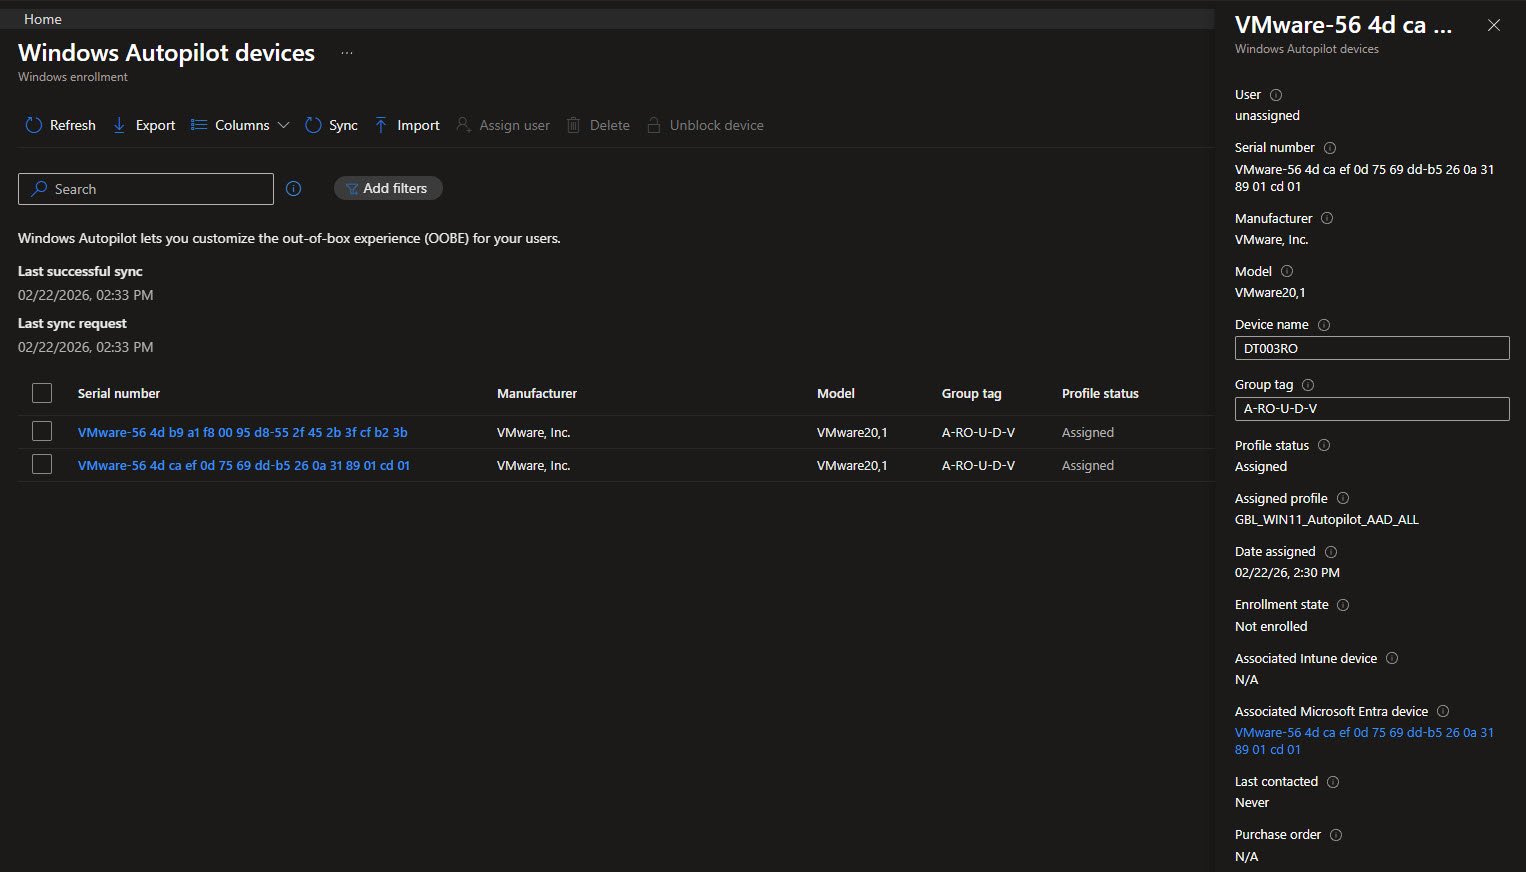
The Autopilot Device Object
Before OOBE even starts, the naming script has already done its job. Opening the Windows Autopilot devices page in Intune shows the registered device with GroupTag “A-RO-U-D-V” and Profile status Assigned, and the detail panel confirms what matters most, the device name is already set to “DT003RO” and waiting, with Enrollment state showing Not enrolled because OOBE has not started yet.
Checking Entra ID at the same moment shows “DT003RO” already in the All devices list, joined but not yet enrolled.

Enrollment ESP
The enrollment
With the device name already set on the Autopilot object, OOBE starts and hands off to the Enrollment Status Page where device preparation completes immediately.
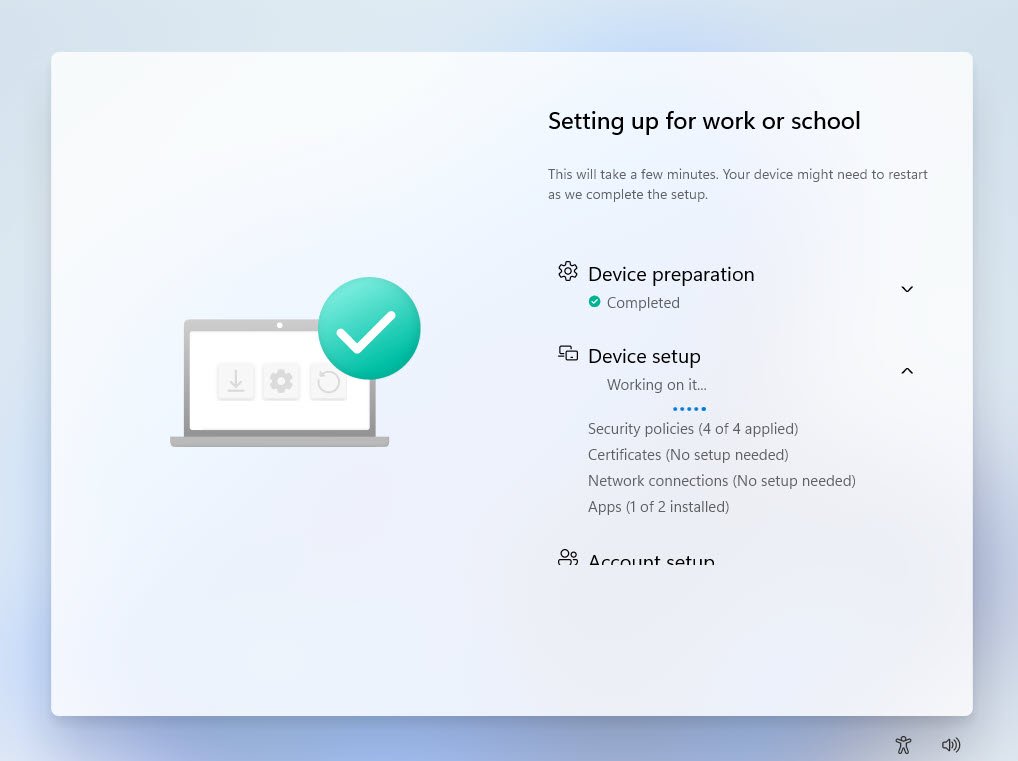
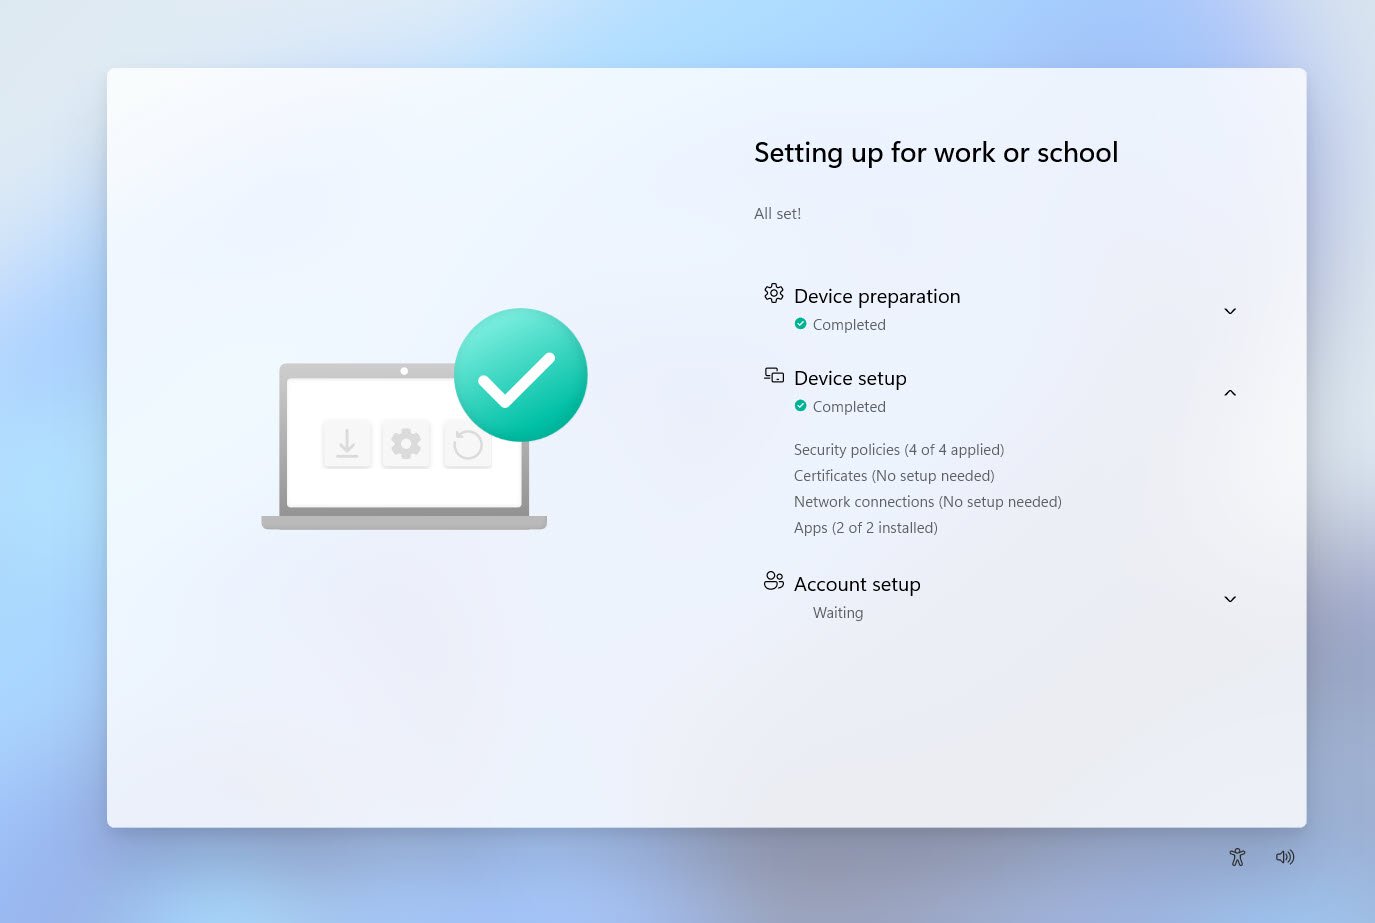
Device setup completes with apps installed and all security policies applied, the ESP shows “All set!” and account setup is waiting for the user to sign in.
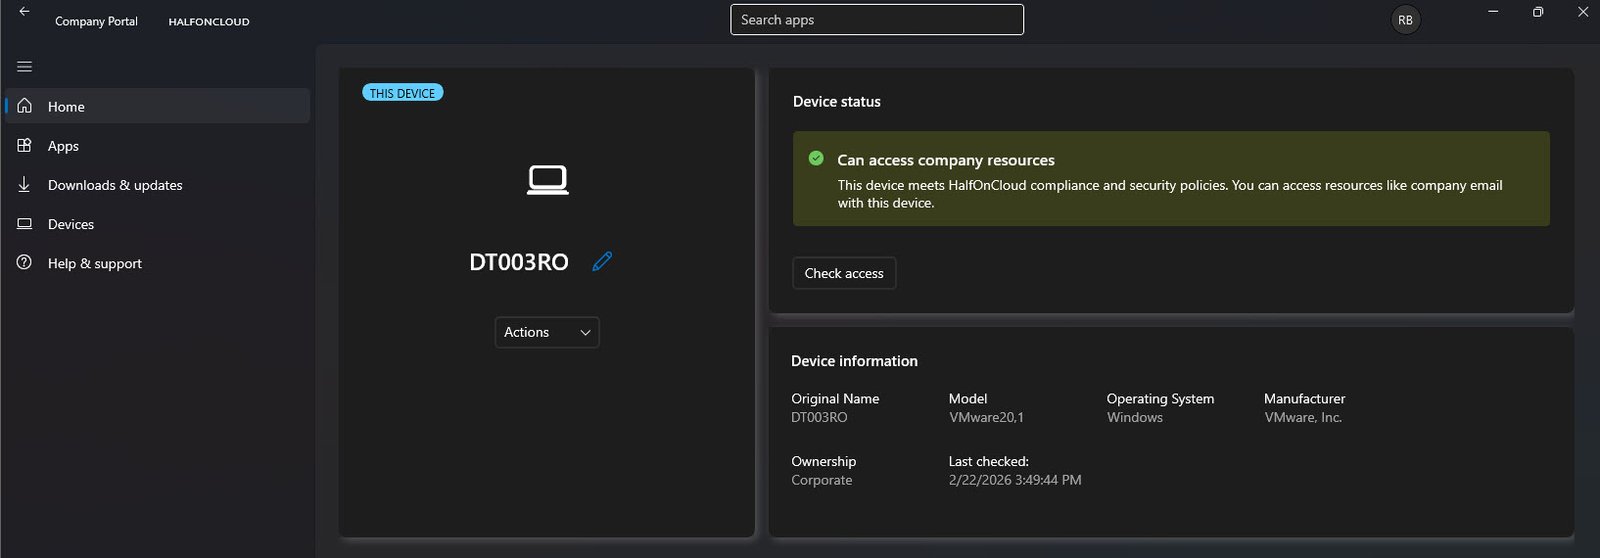
Company Portal confirms the device as DT003RO with status “Can access company resources”, Ownership set to Corporate and the Original Name field showing DT003RO, confirming this was the name the device registered with and not a temporary placeholder that got renamed later.
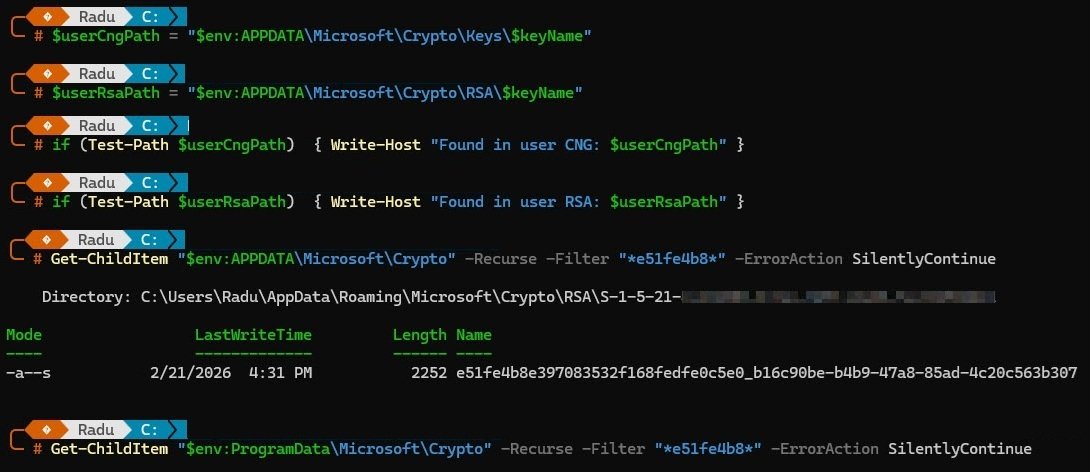
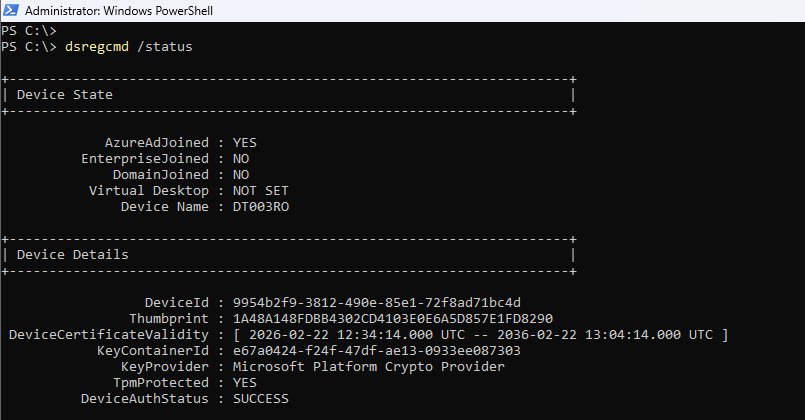
Running “dsregcmd /status” from an elevated PowerShell session confirms the full picture from the device side, with AzureAdJoined YES, DomainJoined NO, Device Name DT003RO, TpmProtected YES and DeviceAuthStatus SUCCESS. The device is properly joined to Entra ID, knows its own name and the TPM is active.
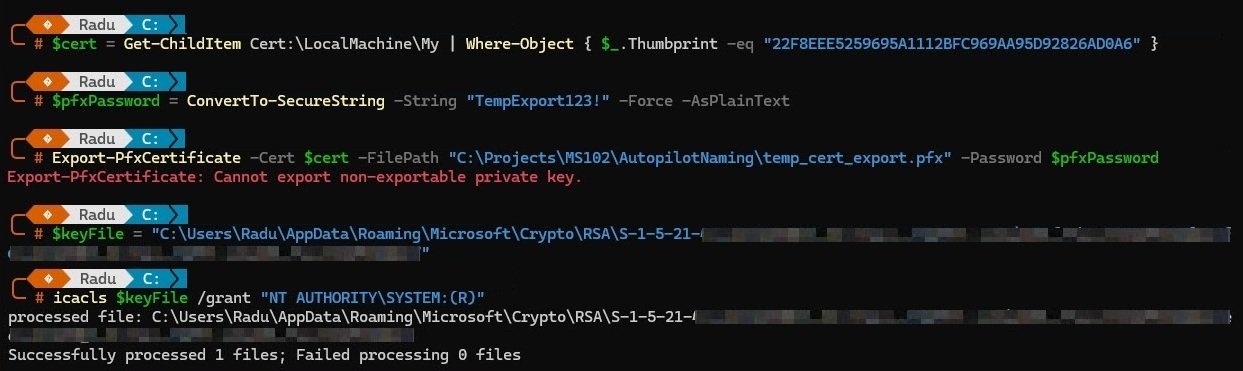
The Intune devices view confirms DT003RO listed with Ownership Corporate, Compliance Compliant and MDM Intune. The naming convention is working exactly as intended.

The final confirmation comes from Entra ID, “DT003RO” appears in the All devices list, Microsoft Entra joined, managed by Intune and showing Compliant. Enrolled and fully operational with the correct name, no manual intervention required.

Security Considerations
This section covers the security aspects of the solution: how the certificate is protected, what the app registration can and cannot do and what the residual risks are for a lab environment versus a production deployment.
Challenge 1: Can’t someone just export the certificate private key?
Yes, if they have local administrator access to the machine running the script, they can open “certmgr.msc” and attempt to export the certificate as a PFX file including the private key. That PFX could then be used from any machine to authenticate as your app registration.
The first layer of defence is that the certificate was created with KeyExportPolicy NonExportable. This tells Windows to refuse standard export requests through “certmgr.msc” or the CryptoAPI export path.
To verify this is in effect on your certificate:
$cert = Get-ChildItem Cert:\LocalMachine\My | Where-Object {
    $_.Thumbprint -eq "<your-certificate-thumbprint-here"
}
$cert.PrivateKey.CspKeyContainerInfo.Exportable
If it returns False, the non-exportable flag is set and standard export is blocked. If it returns True, that is a vulnerability so just delete the certificate and recreate it with the correct parameter.
Note: NonExportable is not an absolute guarantee. Tools like “mimikatz” can extract private keys directly from Windows process memory, bypassing the exportable flag. The only true protection against this is a hardware backed certificate stored in a TPM, where the private key never leaves the chip. For a lab environment, NonExportable is a reasonable control. For production managing thousands of devices, consider TPM-backed certificates or Azure Automation with Managed Identity (see Challenge 4).
The second layer of defence is scope limitation. Even if the certificate were stolen, the app registration has four permissions scoped specifically to Autopilot device management and SharePoint list access. An attacker could modify Autopilot device names and edit the SharePoint list. They cannot read email, access OneDrive files or modify users or policies.
Challenge 2: What about man-in-the-middle attacks on the Graph API calls?
All communication with Microsoft Graph goes over HTTPS with TLS 1.2 or 1.3. Forging a Microsoft TLS certificate would require compromising a trusted root CA, which is not a realistic attack in this context.
The more practical concern in enterprise environments is SSL inspection via a proxy such as Zscaler or Palo Alto. These proxies terminate and re-sign TLS traffic with a corporate certificate, which means the proxy can see the Bearer token in the Authorization header.
If your organisation uses SSL inspection, exclude traffic to login.microsoftonline.com and graph.microsoft.com from deep inspection. Microsoft publishes these endpoints officially for this purpose. For a lab running on a home connection without a corporate proxy, this is not relevant.
Challenge 3: The Bearer token is in memory, can it be stolen?
Yes the $token variable holds a valid Bearer token for up to 3600 seconds. If someone with local admin access dumps the PowerShell process memory while the script is running, they can extract that token and use it directly until it expires.
This is true of every OAuth-based solution, including Microsoft’s own tools. Three practical mitigations are already in place:
- The token is only valid for the four permissions granted to the app registration, so an attacker can only do what the naming script can do.
- The script runs for a few seconds and exits, meaning the token exists in memory for the shortest possible window.
- Every token issuance and Graph API call is logged in Entra sign-in logs, so activity from unexpected IPs or times is visible immediately.
Challenge 4: Why not use Azure Automation with Managed Identity instead?
For production at scale, that is the right answer. Azure Automation with a System Managed Identity eliminates the certificate entirely. The identity is tied to the Azure Automation account resource itself, there is no credential to create, rotate, store or steal.
This solution runs on a local machine because this is a lab environment, that machine already handles other automation tasks and a scheduled task is free. An Azure Automation account adds a monthly cost for something a local task handles without one.
Migrating to Azure Automation later requires minimal changes. The only part of the script that changes is the Get-GraphToken function, which gets replaced with a Managed Identity token request:
# Azure Automation Managed Identity token request (replaces Get-GraphToken)
$tokenResponse = Invoke-RestMethod `
    -Uri "http://169.254.169.254/metadata/identity/oauth2/token?api-version=2018-02-01&resource=https://graph.microsoft.com/" `
    -Headers @{ Metadata = "true" }
$token = $tokenResponse.access_token
Everything else in the script stays the same.
Challenge 5: Anyone with edit access to the SharePoint list can inject a fake serial number
Correct. If someone can add a row to the AutopilotDeviceNaming list with an arbitrary serial number and Status = Pending, the naming script will process it, find the matching Autopilot device and set whatever displayName comes next in the sequence.
The fix is to lock down the list permissions explicitly. SharePoint inherits permissions from the site by default so you need to break that inheritance and restrict access to this specific list.
1. Navigate to the AutopilotDeviceNaming list in SharePoint 2. List settings -> Permissions for this list 3. Click “Stop Inheriting Permissions” 4. Remove all inherited groups except Site Owners 5. Add only the specific users or security group who should be able to create rows 6. Assign them Contribute access (can add and edit rows, cannot change list structure)
The app registration accesses the list via Sites.ReadWrite.All at the application level, which bypasses SharePoint’s user-level permissions. If you want finer control, you can scope the app registration to a specific site using SharePoint site-scoped permissions via Graph API rather than granting it access to all sites.
Security Summary
| Threat | Control | Residual Risk |
|---|---|---|
| Certificate private key theft | NonExportable key policy | Low (requires memory extraction tooling) |
| Certificate theft by local admin | Physical and network security of the scheduled task machine | Medium (accepted for lab) |
| Bearer token interception | TLS 1.2/1.3, no SSL proxy in lab | Low |
| Bearer token memory dump | Short script execution window + scope limitation | Low |
| Unauthorised SharePoint list access | Break permission inheritance, restrict to IT group | Low after configuration |
| App registration over privilege | Least-privilege permissions (4 permissions) | Low |
| No credential in upload script | Device Code Flow (no secrets stored) | None |
The security posture here is appropriate for a lab environment on a non-production tenant. For a production deployment managing real user devices, the recommended next step is to migrate Invoke-AutopilotNaming.ps1 to Azure Automation with System Managed Identity and to use TPM backed certificates if staying with the on-premises approach.
That covers the full solution from WinPE hash capture to sequential device name. Every device that goes through this process gets a consistent, meaningful name with no manual intervention and a complete audit trail in SharePoint.
Maybe one day this same solution gets rebuilt with Logic Apps or Power Automate. When that day comes, there will be an article for it.